Minds On
Let’s get started!
Exploring art
Explore the artwork in the following carousel.


- What elements of design were used to create this artwork?
- What are the similarities and differences between these two portraits?
Record your responses using a method of your choice. If possible, share your thoughts with a partner.
Elements of design
The elements of design are the basic attributes, ideas, and parts that are used to create an artwork. The seven elements of design are line, shape, colour, value, form, texture, and space.
Portrait
A portrait is a painting or a photograph of a person’s face and its expression. The purpose of a portrait is to show the likeness, personality, and even the mood of the person. They may be abstract or realistic, and executed in a variety of media.
Press the following tabs to access definitions of each element of design.

Different types of lines. Horizontal lines go left to right. Vertical lines go up and down. Diagonal lines are straight lines drawn on an angle. Zigzag lines are comprised of straight line segments that take many sharp turns. A curved line is not straight and bends.
Lines are the paths left by a moving point, such as a pencil or a digital drawing tool. A line can be a mark, a guide, or a boundary that leads the audience’s attention in an artwork. Diversity in the type, orientation, and/or quality of lines can be used to suggest a variety of ideas, shapes, or emotions. For example, horizontal and curving lines can feel restful or inactive. Vertical and diagonal lines can create the idea of movement or action. Horizontal and vertical lines can create stability.

Different types of shapes. Geometric shapes are closed figures with straight uniform lines and angles, like squares and triangles. Circles are also a geometric shape and the exception to the rule. Organic shapes are closed figures that don't follow any specific rules, often utilize curved lines, and mimic shapes found in nature. Finally, a positive shape is the space an object takes up while a negative shape is the area between objects.
A shape is a form that is enclosed or outlined. For example, when three lines meet, they create the shape of a triangle. A shape has length and width. A shape’s boundary can be created by line, value, colour, and/or texture. Shapes may be positive or negative.

A colour wheel divided into 12 sections, with each section as a different colour. The top right quarter contains the primary colour yellow, the secondary colour orange, and the tertiary colour achieved by mixing yellow and orange. The bottom right quarter contains the primary colour red, the tertiary colour achieved by mixing red and orange, and the tertiary colour achieved by mixing red and purple. The bottom left quarter contains the primary colour blue, the secondary colour purple, and the tertiary colour achieved by mixing blue and purple. The top left quart contains the secondary colour green, the tertiary colour achieved by mixing green and blue, and the tertiary colour achieved by mixing green and yellow. The left half of the colour with the blue and green colours is labeled cool colours, and the right half with the yellow and red colours is labeled warm colours.
In scientific terms, colour is an attribute of an object when light bounces off it. The four characteristics of colour are hue, value, intensity, and temperature. Colour categories include primary, secondary, and tertiary. Colours can be warm or cool. Cool colours include blue, green, and purple. Warm colours include red, orange, and yellow.

Swatches of green, with the darkest shade of green at the top and descending to the lightest shade. Similar swatches of shades of purple and black are also displayed.
Value is the lightness or darkness in an artwork. Value is created by the gradual changes in the lightness or darkness of an artwork even when colour is absent. Changes in value can be created by adding white or black to a colour and/or by erasing or adding more art medium to an art piece. Value is used to create the illusion of texture and light in art.

Form is the shape and dimensions of an artwork, or objects within an artwork. Forms can be three-dimensional. Form can also mean creating the illusion of a two-dimensional object being three-dimensional. The illusion of form can be created by using shading. Forms can be geometric or organic.

Texture is the feeling and appearance of a surface. Texture can be smooth, rough, furry, or soft. Texture can be the illusion of texture or real texture.

A scenic drawing where the bushes drawn at the bottom of the page appear to be closest to the viewer and are labeled as the foreground. A lake and trees are drawn to appear behind the bushes and take up the majority of the page. They are labeled middle ground. A mountain range and sky is drawn at the top of the page and appears to be behind the trees and lake. The mountains and sky are labeled as background.
Space can be the area around, inside, or between parts of an artwork. Space can be a physical distance between objects. Space can also be an illusion of distance in a two-dimensional piece. The illusion of space can be created by a variety of techniques, including overlapping parts, a variety of sizes, changing value or colour, the use of detail, and perspective.
Action
Get ready, get set…
Contour lines and drawings
The artwork from our Minds On activity are examples of images created with contour lines. They are both types of contour drawings.
Contour line
A contour line is a line that defines an outline or edge of a shape or form.
Contour drawing
A contour drawing outlines the shape or form of a subject or object, and can include its inner details.
Examining contour drawings
Review the contour drawings from our Minds On activity in the following carousel.

With regular contour portraits, you can lift your drawing tool and create multiple contour lines to represent a shape or form.

With continuous contour portraits, you do not lift your drawing tool and create a single, ongoing contour line to represent a shape or form.
Continuous contour drawings
A continuous contour drawing is created with a single, ongoing contour line.
Check out the following video demonstrating the creation of a continuous contour drawing.
Examine the following contour drawing.

- What do you notice about this contour drawing?
Record your answer using a method of your choice. If possible, share your thoughts with a partner.
Press ‘Answer’ to access one possible answer.
This contour drawing is an outline of a cat using one continuous line. The continuous line curves and overlaps to create the shape of a cat.
With continuous contour drawings, you can extend the continuous line to create more details of your subject or object.
Examine the following contour drawing.

- What do you notice about the way line was used to create this contour drawing?
Record your answer using a method of your choice. If possible, share your thoughts with a partner.
Press ‘Answer’ to access one possible answer.
This contour drawing is an outline of a dog using one continuous line. The continuous line curves and overlaps to create the shape of a dog, and extends inwards to detail the dog’s eyes, nose, and mouth.
Cross-contour drawings
In addition to regular and continuous contour drawings, there are also cross-contour drawings.
Examine the contour drawings in the following carousel.


What do you notice about this technique?
Record your answer using a method of your choice. If possible, share your thoughts with a partner.
Press ‘Answer’ to access a possible answer.
Multiple contour lines outline the objects. Collections of thin parallel lines spaced closely together create depth on and around the objects, and give the impression that the objects are three-dimensional forms.
Examine the following contour drawings. Consider how the artist uses a combination of lines to represent each shape of a tree.
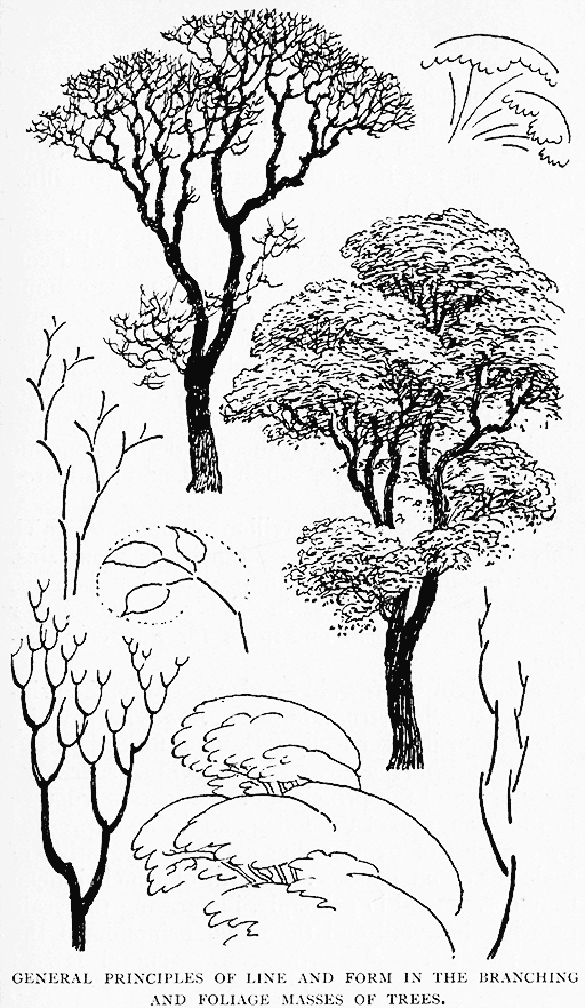
The contours of tree branches are formed using curving and angled lines. The contours of groups of leaves are outlined and filled with the details of individual leaves.
General Principles of Line and Form in the Branching and Foliage Masses of Trees by Walter Crane, 1900 (from “Line and Form”)
- How does separating the different shapes of a subject or object help an artist create a contour drawing?
Record your answer using a method of your choice. If possible, share your thoughts with a partner.
Go!
Analyzing contour drawings
Analyze the following contour drawing by completing the Analyzing Art: Contour Drawings activity in your notebook or by using the following fillable and printable document. If you would like, you can use speech-to-text or audio recording tools to record your thoughts.
|
Record answers to the following questions: |
|
1) Is this a contour drawing, continuous contour drawing, or a cross-contour drawing? Why? |
|
2) How is depth created in this contour drawing? |
Press the ‘Activity’ button to access Analyzing Art: Contour Drawings.

A portrait with the subject’s details outlined using a single, continuous line. The line becomes very dense to form the subject’s hair, eyebrows, eyes, nose, mouth, and jaw. This shading provides detail and creates the illusion that the image is three dimensional.
Consolidation
Putting it all together
You are now going to create a contour drawing. You can ask a partner to sit for a portrait, use a mirror for a self-portrait, or select any subject or object for your drawing.

When you try to create your contour drawing, remember to give yourself time to practice. Artists practice techniques again and again to build their skills. You can do it, too!
Materials Needed
Materials you might need
- drawing tools (like a pen, marker, or pencil)
- colouring tools (like markers, pencil crayons, or highlighters)
- painting tools (like brushes and acrylic or watercolour paint)
- paper
Student Success
Exploring digital creation options
When you are considering digital creation options, explore the variety of digital applications available!
Note to teachers: See your teacher guide for collaboration tools, ideas and suggestions.
Safety
Before you begin, consider these safety precautions:
Creating contour drawings
Creation options
Explore the following carousel of the three possible methods that you can use to create your contour drawing.

Option 1: Description — Record a detailed description of a contour drawing using a method of your choice.

Option 2: Materials — Create a contour drawing using the following materials: drawing tools, colouring tools, painting tools, and paper.

Option 3: Digital — Create a contour drawing using a digital application of your choice.
Steps
Choose one of the previous options, then press the following tabs to access the steps for creating your contour drawing.
Choose a subject or object and decide if you are going to create a regular contour drawing, a continuous contour drawing, or a cross-contour drawing.
Remember that with a continuous line drawing you do not lift your drawing tool off the paper, and you cannot erase.

Start by creating an outline of your subject or object. Once you have created the outline, move on to the inner space and add lots of small details. Take your time!
If you choose to create a cross-contour drawing, add cross-contour lines to create depth.

Add colours to complete your contour drawing.

Pause and Reflect
Time to reflect
When you are finished creating your contour drawing, reflect on the following questions:
- What drawing technique did you use? Why?
- Is your drawing realistic or abstract? Why?
- How do you feel about your contour drawing?
- What would you like to continue to practice?
Record your answers using a method of your choice.
Portfolio
Track your progress
If you have an art portfolio, put your contour drawing in there so that you can track your progress over time.
Share your artwork or description with a partner, if possible.
Reflection
As you read through these descriptions, which sentence best describes how you are feeling about your understanding of this learning activity? Press the button that is beside this sentence.
I feel…
Now, record your ideas using a voice recorder, speech-to-text, or writing tool.