Minds On
Let’s get started!
Exploring art
Explore the following artwork.
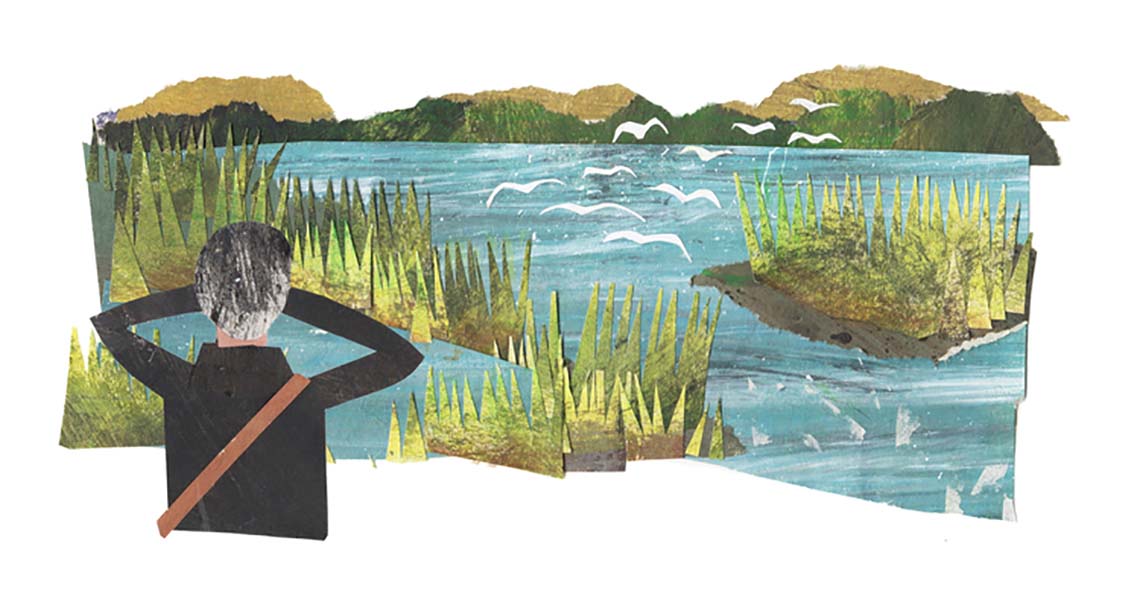
Birdwatchers (Image 5) by Clover Robin, 2018
A person behind grass looking out at birds flying over water towards mountains. Every shape is made of cut-outs that are layered on top of each other.
- What elements of design were used to create this artwork?
- What do you notice about this artwork?
- What do you think this type of artwork is called?
Record your responses using a method of your choice. If possible, share your thoughts with a partner.
The elements of design are the basic attributes, ideas, and parts that are used to create an artwork. The seven elements of design are line, shape, colour, value, form, texture, and space.
Press the following tabs to access definitions of each element of design.

Different types of lines. Horizontal lines go left to right. Vertical lines go up and down. Diagonal lines are straight lines drawn on an angle. Zigzag lines are comprised of straight line segments that take many sharp turns. A curved line is not straight and bends.
Lines are the paths left by a moving point, such as a pencil or a digital drawing tool. A line can be a mark, a guide, or a boundary that leads the audience’s attention in an artwork. Diversity in the type, orientation, and/or quality of lines can be used to suggest a variety of ideas, shapes, or emotions. For example, horizontal and curving lines can feel restful or inactive. Vertical and diagonal lines can create the idea of movement or action. Horizontal and vertical lines can create stability.

Different types of shapes. Geometric shapes are closed figures with straight uniform lines and angles, like squares and triangles. Circles are also a geometric shape and the exception to the rule. Organic shapes are closed figures that don't follow any specific rules, often utilize curved lines, and mimic shapes found in nature. Finally, a positive shape is the space an object takes up while a negative shape is the area between objects.
A shape is a form that is enclosed or outlined. For example, when three lines meet, they create the shape of a triangle. A shape has length and width. A shape’s boundary can be created by line, value, colour, and/or texture. Shapes may be geometric or organic. Shapes may be positive or negative.

A colour wheel divided into 12 sections, with each section as a different colour. The top right quarter contains the primary colour yellow, the secondary colour orange, and the tertiary colour achieved by mixing yellow and orange. The bottom right quarter contains the primary colour red, the tertiary colour achieved by mixing red and orange, and the tertiary colour achieved by mixing red and purple. The bottom left quarter contains the primary colour blue, the secondary colour purple, and the tertiary colour achieved by mixing blue and purple. The top left quart contains the secondary colour green, the tertiary colour achieved by mixing green and blue, and the tertiary colour achieved by mixing green and yellow. The left half of the colour with the blue and green colours is labeled cool colours, and the right half with the yellow and red colours is labeled warm colours.
In scientific terms, colour is an attribute of an object when light bounces off it. The four characteristics of colour are hue, value, intensity, and temperature. Colour categories include primary, secondary, and tertiary. Colours can be warm or cool. Cool colours include blue, green, and purple. Warm colours include red, orange, and yellow.

Swatches of green, with the darkest shade of green at the top and descending to the lightest shade. Similar swatches of shades of purple and black are also displayed.
Value is the lightness or darkness in an artwork. Value is created by the gradual changes in the lightness or darkness of an artwork even when colour is absent. Changes in value can be created by adding white or black to a colour and/or by erasing or adding more art medium to an art piece. Value is used to create the illusion of texture and light in art.

Form is the shape and dimensions of an artwork, or objects within an artwork. Forms can be three-dimensional. Form can also mean creating the illusion of a two-dimensional object being three-dimensional. The illusion of form can be created by using shading. Forms can be geometric or organic.

Texture is the feeling and appearance of a surface. Texture can be smooth, rough, furry, or soft. Texture can be the illusion of texture or real texture.

A scenic drawing where the bushes drawn at the bottom of the page appear to be closest to the viewer and are labeled as the foreground. A lake and trees are drawn to appear behind the bushes and take up the majority of the page. They are labeled middle ground. A mountain range and sky is drawn at the top of the page and appears to be behind the trees and lake. The mountains and sky are labeled as background.
Space can be the area around, inside, or between parts of an artwork. Space can be a physical distance between objects. Space can also be an illusion of distance in a two-dimensional piece. The illusion of space can be created by a variety of techniques, including overlapping parts, a variety of sizes, changing value or colour, the use of detail, and perspective.
Action
Get ready, get set…
Collage
The artwork from our Minds On activity is an example of collage created by the British artist Clover Robin, a crafter and designer with a passion for storytelling and nature.
Collage is a technique where artists layer paper or other objects together to create a composition.
Collages can be created using mixed media by combining mediums such as painting, drawing, and photography on a variety of materials like paper, fabric, and wood. The texture of collage artwork depends on the materials used.
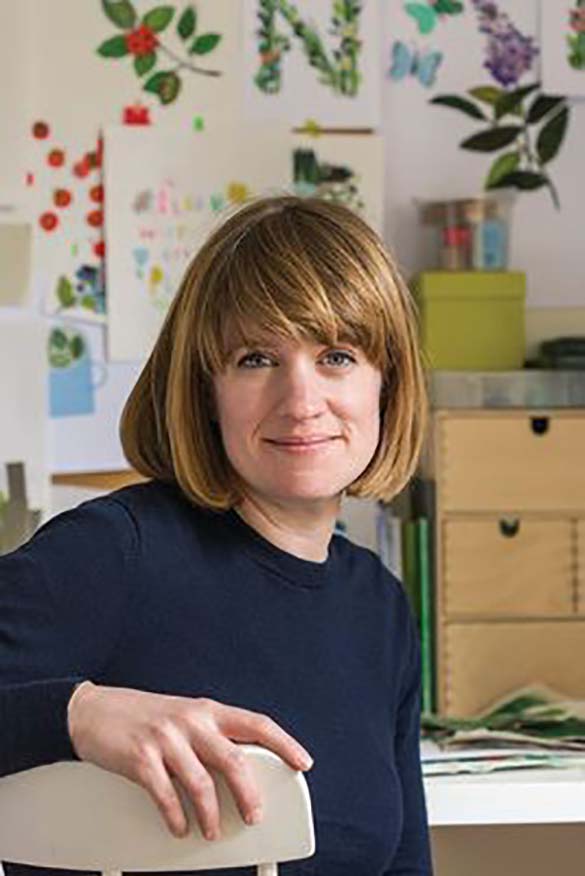
Clover Robin in her studio
Landscape collages use a foreground, middle ground, and background to create depth. This is achieved by making objects smaller in the background and larger in the foreground. Depth can also be created by using a horizon line with a vanishing point.

Press the following tabs to access definitions of key terms for this learning activity.
Collage is a technique that involves arranging a variety of unrelated materials (such as photographs, fabric, found objects, or digital images) on a flat background.
A composition is the organization and arrangement of the elements of design in an artwork. An artist follows the principles of design to create a desired layout.
An artwork in which more than one medium is used is called mixed media. For example, mixed media artwork could use both painting and sculpture or both drawing and photography.
Depth is the apparent distance from the front of an artwork to the back of an artwork.
The foreground is the part of an artwork that appears to be closest to the audience. It is the area in front of other objects and is often at the bottom of the picture plane.
The middle ground is the part of an artwork that appears to be between the foreground and background. It is the area behind objects in the foreground and the area in front of objects in the background.
The background is the part of an artwork that appears to be the farthest from the audience. It is the area behind other objects and is often at the top of the picture plane.
A horizon line is a horizontal line created across an artwork that represents where the sky and the earth appear to meet.
A vanishing point is the point in an artwork where marked or suggested lines converge to create the illusion of depth. This point is usually on the horizon line and appears to be the farthest point from the audience.
Examining landscape collages
Examine the following landscape collage from our Minds On activity.
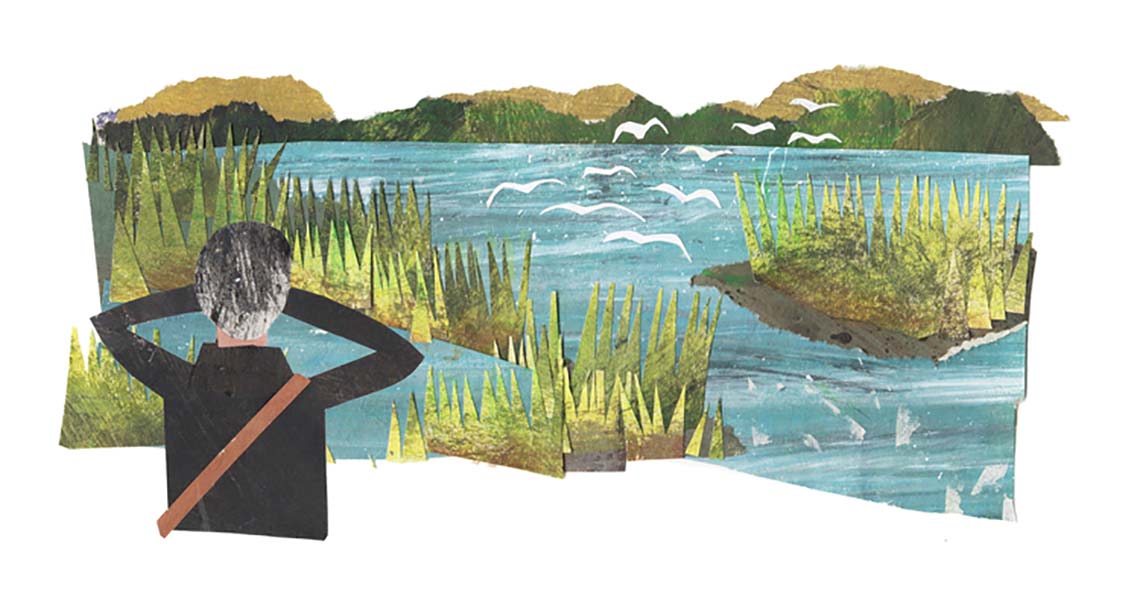
Birdwatchers (Image 5) by Clover Robin, 2018
A person behind grass looking out at birds flying over water towards mountains. Every shape is made of cut-outs that are layered on top of each other.The person is in front of the grass, birds, water, and mountains. The grass, birds, and water are behind the person, but in front of the mountains. The mountains are behind the person, grass, birds, and water. The person is larger than the grass and mountains. The grass is smaller than the person but larger than the mountains. The mountains are smaller than the person and grass. The birds neatest to the person are larger than the bird farthest from the person. The sky and earth appear to meet at a line separating the water from the mountains. The arrangement of the person and birds form suggested lines that converge on a point that appears to be the farthest point in the image. This point is on the right side of the line where the sky and earth appear to meet.
- What objects are in the foreground of this collage?
- What objects are in the middle ground of this collage?
- What objects are in the background of this collage?
- How is depth created in this collage?
- Where is the horizon line in this collage?
- Is there a vanishing point in this collage? Where?
Record your answers using a method of your choice. If possible, share your thoughts with a partner.
Press ‘Answers’ to access possible answers.
- The person is in the foreground.
- The grass, birds, and water are in the middle ground.
- The mountains are in the background.
- Depth is created by having objects smaller in the background and larger in the foreground. Depth is also created with a horizon line and vanishing point.
- The horizon line is the line separating the water from the mountains.
- Yes, the vanishing point is on the right side of the horizon line.

Examine the following landscape collage.
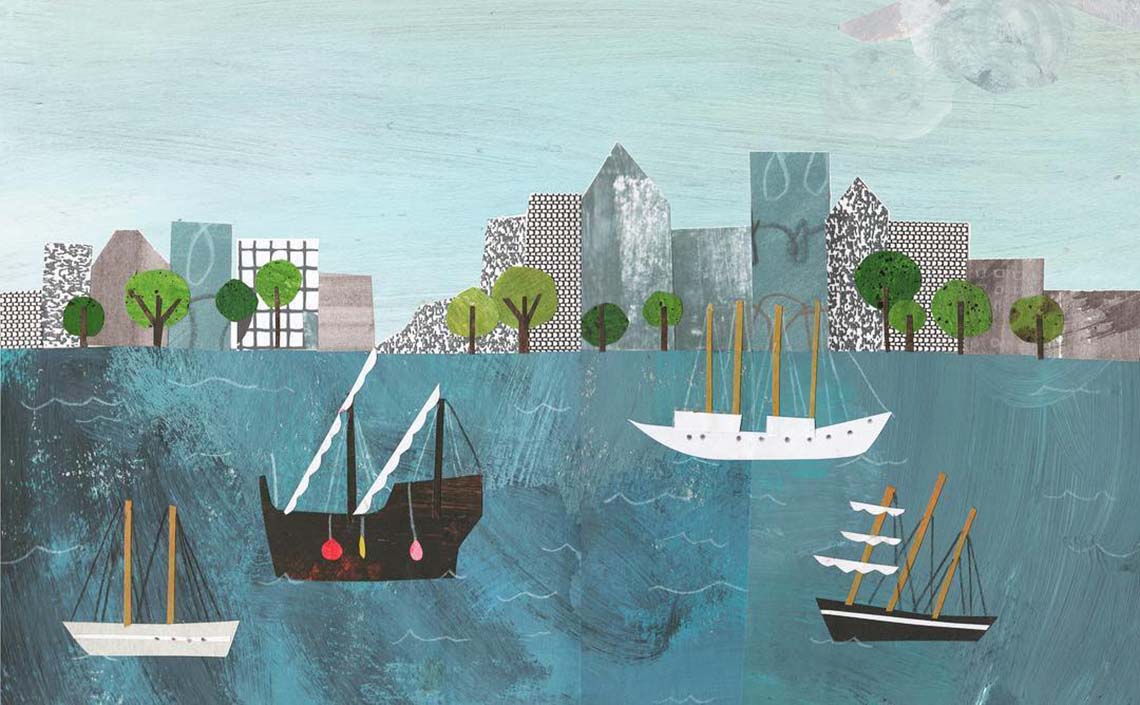
Image from the book Cut Paper Pictures (2018) by Clover Robin
Four boats on water with trees and towers on the shoreline. Every shape is made of cut-outs that are layered on top of each other. The boats are in front of the water, trees, towers, and sky. The water and trees are behind the boats, but in front of the towers and sky. The towers and sky are behind the boats, water, and trees. The boats are larger than the trees and towers. The trees are smaller than the boats and towers. The towers are smaller than the boats but larger than the trees. The sky and earth appear to meet at a line separating the water from the trees and towers.
- What objects are in the foreground of this collage?
- What objects are in the middle ground of this collage?
- What objects are in the background of this collage?
- How is depth created in this collage?
- Where is the horizon line in this collage?
- Is there a vanishing point in this collage? Where?
Record your answers using a method of your choice. If possible, share your thoughts with a partner.
Press ‘Answers’ to access possible answers.
- The boats are in the foreground.
- The water and trees are in the middle ground.
- The towers are in the background.
- Depth is created by having objects smaller in the background and larger in the foreground.
- The horizon line is the line separating the water from the trees and towers.
- No, there is not a vanishing point.

Go!
Analyzing landscape collages
Analyze the following landscape collage by completing the Analyzing Artwork: Clover Robin activity in your notebook or by using the following fillable and printable document. If you would like, you can use speech-to-text or audio recording tools to record your thoughts.
| Record answers to the following questions: | |
|
1a) What objects are in the foreground of this collage? |
|
|
1b) What objects are in the middle ground of this collage? |
|
|
1c) What objects are in the background of this collage? |
|
|
1d) Where is the horizon line in this collage? |
|
|
2) How is space used to create depth in this collage? |
|
|
3) How is texture used in this collage? |
|
|
4) What mediums and materials do you think Robin uses to create her collages? |
|
|
5) What message do you think Robin might be conveying through her collages? |
|
|
6) Have you experienced other collages made using different mediums or materials? |
|
Press the ‘Activity’ button to access Analyzing Artwork: Clover Robin.
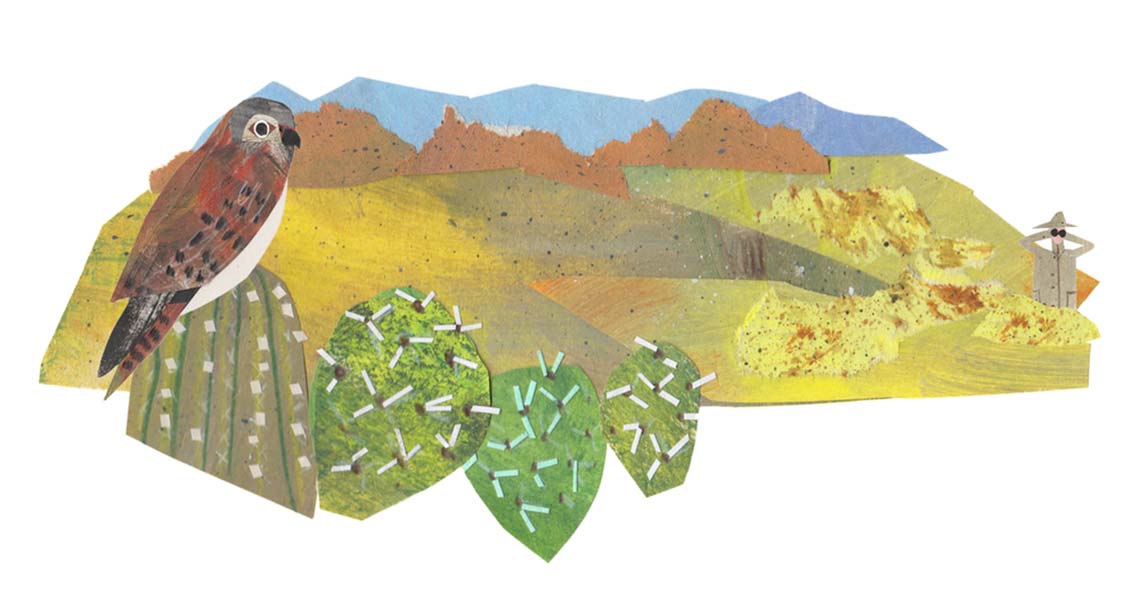
Birdwatchers (Image 1) by Clover Robin, 2018
A falcon perched on a group of cacti in a desert with a person using binoculars to look at the it from behind rocks in the distance. Every shape is made of paper cut-outs that are painted to create different textures and are layered on top of each other. The falcon and cacti are in front of the sand, rocks, person, mountains, and sky. The sand, rocks, and person are behind the falcon and cacti, but in front of the mountains and sky. The mountains and sky are behind the falcon, cacti, sand, rocks, and person. The falcon and cacti are larger than the person, rocks, and mountains. The person and rocks are smaller than the falcon and cacti but larger than the mountains. The mountains are smaller than the falcon, cacti, person, and rocks. The sky and earth appear to meet at a line separating the sand from the mountains and sky.
Consolidation
Putting it all together
You are now going to create a landscape collage. You can choose any theme and use any medium.
When you try to create your landscape collage, remember to give yourself time to practice. Artists practice techniques again and again to build their skills. You can do it, too!
Materials Needed
Materials you might need
- drawing tools (like a pen, marker, or pencil)
- colouring tools (like markers, pencil crayons, or highlighters)
- painting tools (like brushes and acrylic or watercolour paint)
- paper
- scissors
- glue
Student Success
Exploring digital creation options
When you are considering digital creation options, explore the variety of digital applications available!
Note to teachers: See your teacher guide for collaboration tools, ideas and suggestions.
Safety
Before you begin, consider these safety precautions:
Creating landscape collages
Creation options
Explore the following carousel of the three possible methods that you can use to create your landscape collage.
Steps
Choose one of the previous options, then press the following tabs to access the steps for creating your landscape collage.
If you have chosen the materials option, colour separate pieces of paper using at least five different colours. Feel free to mix colours and add texture to your papers. Make sure to let them dry.
You can also use colour construction paper or colour packages from the recycling bin.

Decide what objects you want to include in your landscape, such as plants, animals, people, buildings, and landforms. Consider the message you want to convey.

Begin to cut out or digitally create the pieces of your landscape, then place them into a composition without gluing them down yet.
Make sure to include a foreground, middle ground, background, and horizon line.
Play around with the placement of your objects. Embrace the sense of spontaneity and freedom in creating art.

Remember to overlap your objects to create texture, then add details to your landscape with drawing tools.

Once you are happy with the arrangement of your composition, glue all of your objects down.

Pause and Reflect
Time to reflect
When you are finished creating your landscape collage, reflect on the following questions:
- What kind of landscape did you create? Why?
- How did you create depth in your landscape collage?
- How do you feel about your landscape collage?
- What would you like to continue to practice?
Record your answers using a method of your choice.
Portfolio
Track your progress
If you have an art portfolio, put your landscape collage in there so that you can track your progress over time.
Share your artwork or description with a partner, if possible.
Reflection
As you read through these descriptions, which sentence best describes how you are feeling about your understanding of this learning activity? Press the button that is beside this sentence.
I feel…
Now, record your ideas using a voice recorder, speech-to-text, or writing tool.


