Minds On
Analyze this!
First impression
Let’s examine two different presentations.
Consider the following questions as you explore each presentation:
- What did you think of the presentation?
- Do you like the presenter’s presentation style? Why or why not?
Explore this video entitled “Hand Washing” to learn more about the importance of hand washing from Dr. Sandy Skotnicki.
Access this video entitled “Officer Peter” to learn more about the job of a police officer from Peter De Quintal, police constable of the Toronto Police Service.
Action
Part 1: Vocal effects and non-verbal cues
Did you notice how both Dr. Skotnicki and Police Constable Peter use a combination of non-verbal cues and vocal effects? These aspects of spoken language help us to communicate meaning, and also make our message memorable.
Let’s explore different types of vocal effects and non-verbal cues.
What are vocal effects?
Vocal effects involve the vocal aspects of our delivery, including tone, pace, pitch, and volume.
Press each tab below to learn about the vocal effects for presentations.
What are non-verbal cues?
Non-verbal cues are the things we communicate without words, including facial expression, gestures or movement, and eye contact.
Press each tab below to learn more about non-verbal cues for presentations.
Second impression
Explore the videos from the Minds On section a second time.
This time, keep track of the vocal effects and non-verbal cues that the presenters use. You can record your observations in the graphic organizer below or using another method of your choice.
TIP: These observations will help you draft your presentation later in this activity.
Complete the Analyze This: Non-verbal Cues and Vocal Effects Chart in your notebook or using the following fillable and printable document.
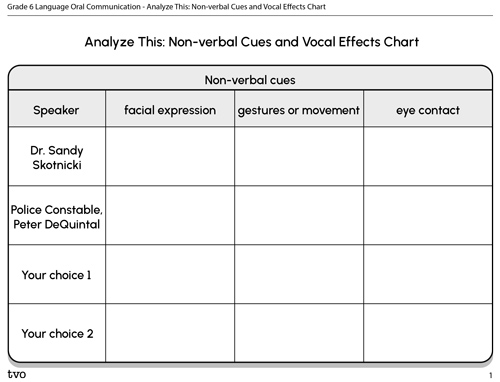
Press the Activity button to access the Analyze This: Non-verbal Cues and Vocal Effects.
Activity (Open PDF in a new tab)Part 2: Tips for effective presentations
Now that you are more familiar with non-verbal cues and vocal effects, create a checklist that you can refer to for your own presentations.
You can use Teacher Wynne’s advice (in the following video) to create your checklist. Record your ideas in the checklist template following or by using a method of your choice.
Explore this video entitled “Learn How to Make a Presentation” where Teacher Wynne shares five tips to help you become a better presenter. Keep track of important details using a method of your choice.
Complete the Checklist Template in your notebook or using the following fillable and printable document.
| Strategy | Description |
|---|---|
|
|
Press the ‘Activity’ button to access Checklist Template.
Here’s the gist
- Be confident. As Wynne explains, “when you believe in what you’re saying, then you make everyone else believe in what you’re saying.” It’ll be easier to capture an audience’s attention, appeal to their understanding (inform), and inspire or persuade them to take action.
- Tone, pace, pitch volume. Wynne only mentions volume, but it’s important to consider a combination of vocal effects in your presentation. For example, you might have practiced your tone, pace, and pitch, but if you speak too softly, the audience won’t hear your message.
- Non-verbal cues. Again, Wynne only mentions eye contact, but try to consider all the non-verbal cues we’ve explored, including facial expression, gestures, and eye contact.
- Practice: Practice, practice, practice. Once you have drafted your presentation, practice it many times with your family, friends, or pets around. This way you can get feedback on your presentation and make improvements before you present.
- Have fun: Teacher Wynne is right. Presentations can be nerve-wracking, but it’s important to remember why you’re giving a presentation in the first place. You care about your topic and you want to share it with others, and inspire them in some way.
On your mark, get set, draft!

What next? It’s time to draft the script for your presentation. You can type, write, use speech-to-text, or audio record your draft.
Whatever format you choose, craft your presentation in a way that hooks your audience, delivers a strong message, and entertains your audience. It should be no more than five minutes long.
Here’s your step-by-step:
- Select a topic that you care about. This is important! It’ll be easier to capture an audience’s attention, appeal to their understanding (inform), and inspire or persuade them to take action. Just keep in mind that if you want to inspire your audience to do something it should be realistic.
- What’s your hook? How will you connect with your audience so that you can get them to invest in your or topic or idea?
- Explain. What is the current issue? For example, what is the current environmental challenge? If you’re trying to raise awareness about water conservation, what do you want your classmates to understand about it? How does it impact our communities in the present and future?
- Takeaway. Share possible solutions and action that people can take. What are one-three different things that people can do (i.e., changes they can make) to help make a difference? Just keep in mind that if you want to inspire your audience to do something, it should be a realistic goal.
Consolidation
Practice presenting
Once you have drafted your script, practice presenting it.
You can audio or video record yourself, or practice presenting it to a partner. It’s up to you!

Time to reflect

Use the following questions to reflect on your learning. Record your responses using a method of your choice.
- What is the purpose of your presentation?
- Who is your presentation for? Explain your thinking.
- What have you learned through this planning process that you can use to make your oral presentations more effective?
- What have you learned through this process that you can use in your communication?
Reflection
As you read through these descriptions, which sentence best describes how you are feeling about your understanding of this learning activity? Press the button that is beside this sentence.
I feel…
Now, record your ideas using a voice recorder, speech-to-text, or writing tool.