Minds On
What’s it all about?
Have you ever told a friend, family member, or a teacher about something interesting, fun or important that happened in your day?


Maybe you need a friend to share their personal recount with you. They need to give you the details of an event you missed.
Let’s learn about the writing process and writing a personal recount.
Action
Stage 1: Brainstorming
The first stage in the writing process is brainstorming. Brainstorming can be really fun, and it helps us get our ideas flowing so we don’t feel stuck staring at a blank screen or paper. Let’s explore one method: a mind map.
We use a web or make a mind map if we ever need to think about and pick a topic or experience to recount or retell. You will be asked to do this in the “Consolidation” section of this learning activity.
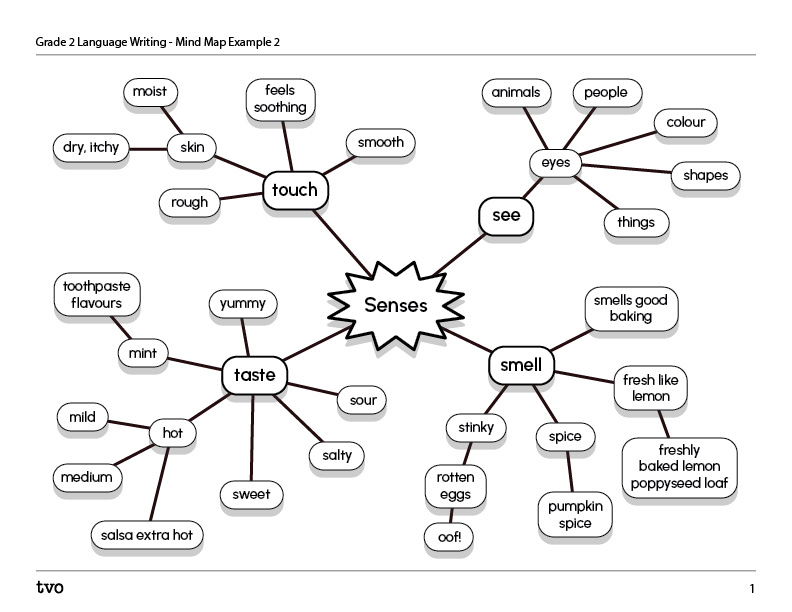
There is no right or wrong way to make a mind map. They can look different each time depending on the ideas in your mind at the time! Here are some other examples of how a mind map might be displayed. Sometimes they are called sketch notes or webs. They do not have to have colour.
Brainstorming is only the start of writing and shouldn’t be rushed but also shouldn’t take a whole lesson period either! Sometimes it helps to add pictures and words. Don’t worry about spelling or even writing complete sentences yet.
Explore the following mind map samples to help you get started. You can also create a descriptive mind map in an audio recording.

We first start with a blank sheet of paper.
Then we write our topic in the centre and start drawing a line out to other words about our topic.
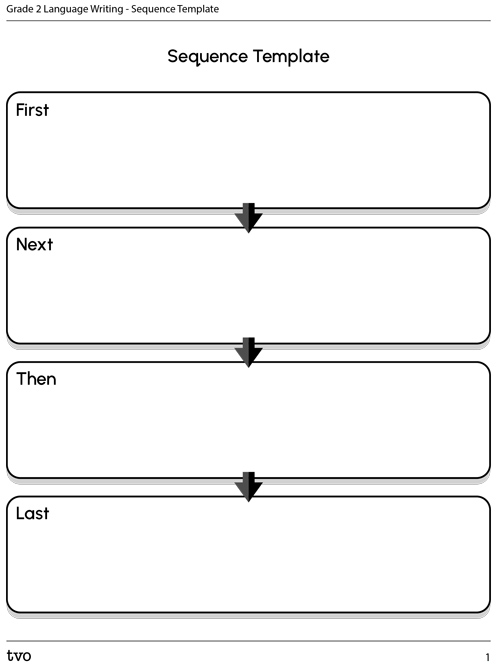
Once we have our ideas or information on our mind map, we can start to order them using a graphic organizer for ordering events called a sequential chart.
Stage 2: Ordering events
We can use a mind map to write the events in the order that they occurred.

Sequence of events
Try to order the events from Tumbletown Tales on your own using either the blank sequence chart or the partly filled-in sequence chart provided. Once you’ve sequenced the event, if possible, ask for feedback from someone.
Use one of the Sequence templates in your notebook or use the following fillable and printable document to help you get started.
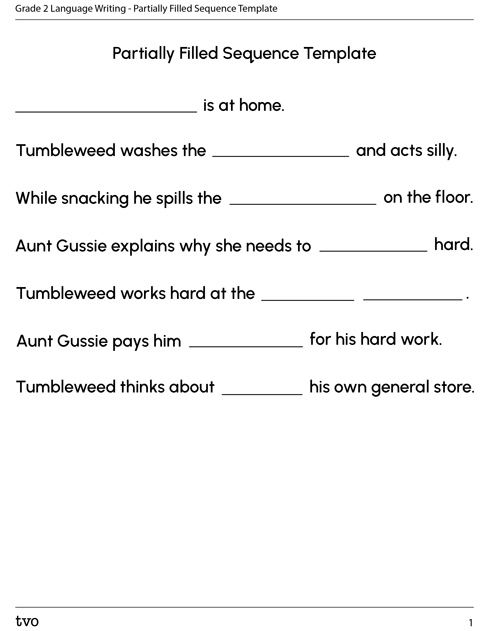
Press the Activity 2 button to access the Partially Filled Sequence Template.
Activity 2 (Open PDF in a new tab)Some linking words are:
- first
- second or next
- then
- after or afterwards
- finally or lastly
Stage 3: Create a draft
Now we’re in our draft stage. Before we create our draft paragraph, we want to keep in mind two important elements to include while we create our draft: 5Ws 1H and paragraph format.
5Ws 1H checklist
We can use a 5Ws 1H checklist to make sure we mention who, what, where, when, why, and how in our personal recount.
You can watch this video as Teacher Wynne goes over the 5Ws and 1H. We can use this strategy for reading, watching a film or story, or thinking about what we need to include in our personal recount.
Paragraphs
A paragraph starts with a topic sentence, followed by a few describing sentences that include
adjectives and a closing sentence.
Topic Sentence
Describing Sentence 1 (with 1 adjective or more)
Describing Sentence 2 (with 1 adjective or more)
Describing Sentence 3 (with 1 adjective or more)
Closing Sentence
There are a lot of things to think about and try to remember. Even though we try our best, we still might accidentally forget a few things but that’s OK because this is only our first draft.
The important thing about our first draft is to use our mind map and sequence chart to write. Also, as you write more ideas may come to mind – you can add them to your mind map, or sequence chart. Writing isn’t usually a straightforward process. We will review and revise our draft to make necessary changes afterwards.
Now you are ready to write your first draft.
You may wish to write your draft in your writing journal, a lined sheet of paper or type it out.
Stage 4: Revision
Congratulations! You’ve completed your first draft. Sometimes, if you think of more ideas or information to add afterwards, you may need to write a second draft.
Use the following checklist for a personal recount paragraph.
Personal Recount Checklist
Paragraph
5W 1H
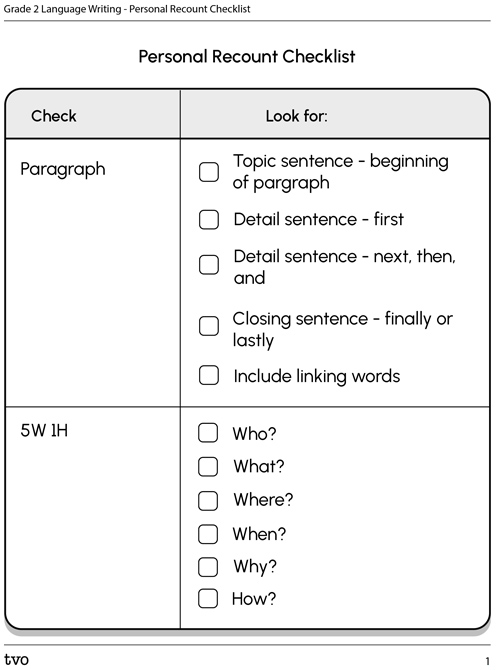
Press the Activity button to access the Personal Recount Checklist.
Activity (Open PDF in a new tab)You may wish to keep a copy of the checklist as a reference.
We can also add adjectives to give more information. Access this short, animated lesson about adjectives.
Using specific vocabulary, and terminology, proper nouns can help make our personal recount more detailed and interesting to read.
Capitals and punctuation
The last part of revising is to check for correct sentence structure and punctuation.
Make sure you check it over for correct sentence punctuation. This means to make sure your sentences start with a capital and end with a period. Also make sure proper nouns like names of people and places all start with a capital.
Use this Punctuation Checklist now to check over your paragraph.
Punctuation Checklist
Capital used:
Periods used:
Commas used:
If you have made a lot of revisions and corrections, you may need to write a final draft to include all the necessary changes from your first draft.
Once you have your final draft, you are ready for publishing!
Stage 5: Publishing
The last and often the most fulfilling part of the writing process is sharing your final draft as a polished piece of writing.
This is where you can change certain fonts, make sure your layout is clear, spaced out, and appealing, and include a diagram, photograph, or illustration with a caption.
- font (colour, bold, italics)
- layout
- diagram, photograph, or illustration with caption
You can publish your personal recount by writing it by hand, typing and printing it, or publishing it to your class website or online class.
Consolidation
Your turn!
Now you’re ready to engage in the writing process by choosing a special event or celebration of your own culture or of a culture in your community to write a personal recount.

Stage 1: Brainstorming
Choose a graphic organizer or make a mind map of possible topics. What do you think might be next?
If you predicted another mind map, then you’re right! Next is to make a mind map or sketch-note of the events of your personal recount topic.
Stage 2: Ordering events
Next, use a sequential chart to order your events.
Stage 3: Create a draft
Use the Personal Recount Checklist in your notebook or use the following fillable and printable document to include the 5Ws 1H and linking words to write your first draft.
Press the Activity button to access the Personal Recount Checklist.
Activity (Open PDF in a new tab)Stage 4: Revision
Now, if possible, seek feedback from a peer or teacher to make sure your ideas are ordered logically and in proper sequence. Make any necessary changes.
Now look over your draft to see if there are words or phrases that can be changed to include proper names, specific vocabulary and/or adjectives.
Next, look over your draft to check for proper punctuation and capitals (at the start of sentences and proper nouns).
Did you include everything you needed to?
Go over the Punctuation Checklist now.
Punctuation Checklist
Capital used:
Periods used:
Commas used:
Write your final draft.
Stage 5: Publishing
Publish your work to your online classroom, class website, or writing wall.
Congratulations! Give yourself a nice pat on the back for all your hard work!
Reflection
How do you feel about what you have learned in this activity? Which of the next four sentences best matches how you are feeling about your learning? Press the button that is beside this sentence.
I feel…
Now, record your ideas about your feelings using a voice recorder, speech-to-text, or writing tool.