Minds On
What kind of writing?
Take a few moments on your own to think about the kinds of writing or texts where you have noticed images similar to the following kinds.

Think about the last time you read an informational text. How did you know what it was about? Reports are part of informational texts. Think of times when you have written a report. What was the topic about? How did you let the reader know the topic? What did you have to do and include in your report? What did you like best about report writing? What did you find challenging?
Student Success
Think-Pair-Share
What are some features in the images you just examined that belong to a report/information text? What makes an informational text different than a story picture book or chapter book?
Note to teachers: See your teacher guide for collaboration tools, ideas and suggestions.
In this learning activity you will learn about the elements and features of a report and write a report on a specific topic in a subject/strand.
Action
Report elements and features
What are the parts of a report?
Parts of a report include:
- Topic Title
- Table of Contents
- Introduction
- Body:
- a paragraph for each subtopic with facts and examples
- compares facts and information (lists or describes differences and similarities)
- usually written in present tense (as new understandings continually change with discoveries and new research)
- a heading or subtitle for the paragraph/subtopic
- Images with captions
- Conclusion
- Appendix

What are the features of a report?
Features (contents) of a report include:
- title, subtitle or subheadings
- table of contents
- photos with captions
- diagrams with labels
- charts, graphs, and/or maps
- appendix
- glossary with specific key terms (subject specific vocabulary); you may or may not be required to include one depending on the requirements set out by your teacher
- sources (where you got your information)
Part 1: Topic
Choose a topic of interest to you. You may be instructed to choose a topic from a subject strand such as a topic part of grade 4 Science’s Habitat strand, or grade 4 Science’s Rocks and Minerals strand, or grade 4 Social Studies’ Political and Physical Regions of Canada, or grade 4 Social Studies’ Early Societies.
Part 2: Subtopics and early research
Access the following fillable and printable Subtopic Graphic Organizer provided to help you. You can also complete the activity in your notebook. You can also use a graphic organizer from your teacher.
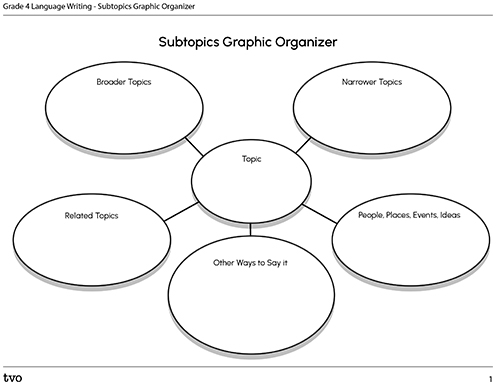
Press the Activity button to access the Subtopic Graphic Organizer.
Activity (Open PDF in a new tab)If you already have some subtopics in mind, start to fill in parts of your subtopics graphic organizer. If not, that’s fine! Add onto this subtopic graphic organizer as you research and gather facts and form a clearer idea of your subtopics.
Part 3: KWHLAQ topic
Access the following fillable and printable KWHLAQ Chart and fill in the first 3 columns. You can also complete the activity in your notebook.
Things to include in your chart:
- 1st column: In the What I Think I Know column, include what you learned and/or already knew about your topic.
- 2nd column: In the What I Want to Know/Learn column, ask questions that you would like to find out more about in your research. Try to include easy to look up questions like 5W and H, as well as higher order questions that relate to cause and effect like WHY or HOW. Ask for feedback from an adult about your questions. Your adult may guide you to rewording some of your questions and/or adding some additional questions.
- 3rd column: In the How I Will Find Out column, you can ask questions about how to find out more information to help you answer your questions in the 2nd column.

Part 4: Plan for finding information and sources
Using your ideas in the 3rd column of your KWHLAQ chart, plan for how you’re going to locate information.
- What search sites will you use?
- What online search databases are available in your school/school board library?
- Will you use your public library search engine?
- Will you interview an expert?
- Will you consult magazines, news broadcasts or podcasts?
Add onto the How I Will Find Out column of your KWHLAQ chart.
Part 5: Searching using keywords and synonyms
Part of research is to search for information to help answer your research question(s). Searching for information is done using keywords. Brainstorm some important words or keywords that might be related to your topic and research questions (in the 2nd column of you KWHLAQ chart). Make a keyword list.
Keywords help narrow our searches to find the information we are looking for. Keywords can be a single word, two words or a phrase that are part of your research topic or that you think will help answer your research questions.
Practice
You are going to practice using the words kid’s health to do a search online. Scan (look briefly at the titles and text of) the search results. What kind of websites, titles, and text come up? According to Google, about 4,270,000,000 results come up. That’s a lot of search results! You probably agree the search results are quite broad for a chosen research topic.
Synonyms and thesaurus
Take some words in your keywords and/or phrases and look them up in a thesaurus. A thesaurus is ordered in alphabetical order like a dictionary but instead of providing a word definition, a thesaurus lists alternative words or synonyms. Look up some synonyms for the word “kid.”
Press the ‘Synonyms for kid’ button to learn more about different synonyms for the word “kid.”
Some synonyms for “kid” you may have found are “child, youth, youngster, juvenile, teenager, baby, infant, minor, youth” or maybe more. Choose a few words from your keywords and search some synonyms. With a partner, help each other source some synonyms using a thesaurus for you and your partner’s keywords. Record your responses.
keyword: (Blank) synonyms: (Blank)
If you have some phrases, with the help of your partner, try to think of alternative ways to phrase it. Help your partner come up with some alternatives if they have phrases in their keyword list.
Part 6: Search with your keywords
Now, try doing a search with your keywords and/or phrases in your KEYWORD LIST. Scan the search results shown in your web browser. Did the search results seem to have the kinds of websites and relevant information you were looking for? Pick one teacher-approved website link to open in a new tab in the browser window so that you can return to your search results. Access the following printable Website Approval Checklist to help you check if this website is suitable to answer some of your research questions.
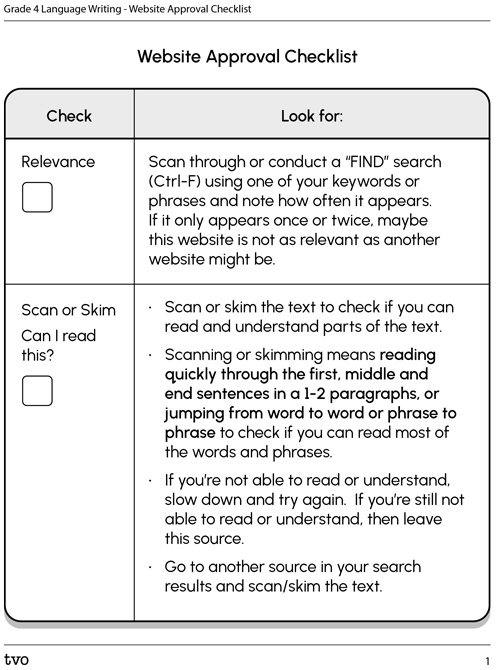
Press the Activity button to access the Website Approval Checklist.
Activity (Open PDF in a new tab)Adjust search using synonyms as keywords in your next search
If you find your first search results don’t bring suitable or relevant websites (according to the Website Approval Checklist), then you will need to adjust or change your keywords by using a synonym and/or other ways of phrasing to find sources with the information you’re looking for. Repeat the same steps for choosing a website to determine its suitability using the Website Approval Checklist.
Research
As you record jot notes and your sources, you should also gather/record images or photos and their sources. You will need to ensure you are following proper education copyright expectations, and also record the photographer or artist, title of the photo and the source. Otherwise, you can create your own drawings or choose to take suitable relevant photographs for your topic.
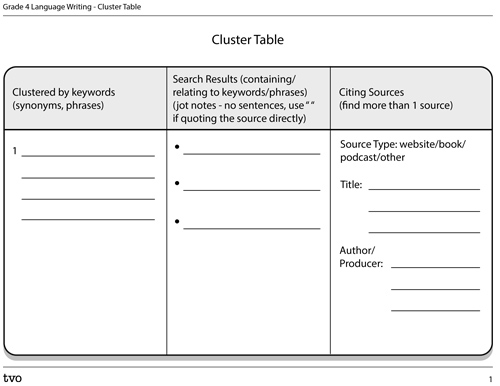
Part 7a: Search and record with jot notes
When you have found a credible source, read through the information at least once. After the first read through, record relevant information using jot notes.
The rules for jot notes are:
- NO SENTENCES!!!!!
- look at a key part of the text, cover it or hide it while you write the jot note in your own words without using sentences
- check your jot notes against the part of the source text after
- if you need to add more jot notes, read over the text in your source, then cover it and don’t look at it while you write your jot notes
- if you are quoting the source directly (i.e. copying the text) you must use quotation marks to start and end where you are quoting “ ”
- you must also cite the source that you are quoting in the last column of the table
Use the following fillable and printable Cluster Table to help you record your jot notes or use a more detailed cluster graphic organizers provided to you below.
Clusters are used to group your jot notes that are grouped together under one research question or subtopic.
Part 7b: Organizing ideas
Subtopics
Review your cluster table to determine if you need to make any organizational changes to how you’ve grouped your topic into subtopics. Use a new graphic organizer or make a simple outline of your subtopics. For example,
- Topic
- Sub-topic 1
- Sub-topic 2
- Sub-topic 3
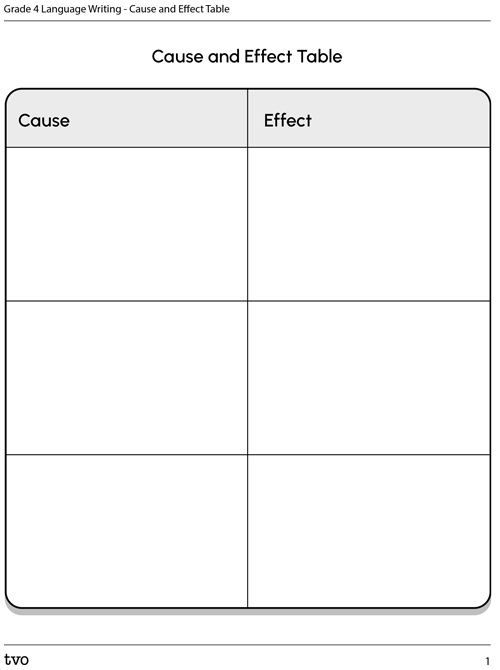
Go back over your research notes and search for cause and effect relationships and/or compare facts or information using a Venn Diagram or another organizer of your choice.. You may make comparisons within a subtopic. For example in the Minds-On images of a sea turtle, a student might compare sea turtles from different habitats of 2 sea turtles species (out of the 7 remaining species left in the world), or you may compare the habitat of the female sea turtle to the habitat of a male sea turtle.
You can also explain why and how the sea turtle habitats are different using a cause and effect table. For example, if a male sea turtle leaves their ocean habitat, then…. If a female sea turtle never leaves her ocean habitat, then….
Access the following fillable and printable Cause and Effect Table to help you organize and group your ideas. You can also complete the activity in your notebook.
A paragraph for each subtopic
Now you want to organize your ideas into a paragraph frame according to a subtopic. Explore the following Homework Zone episode entitled “Paragraph” to refresh ourselves on how to structure a good paragraph.
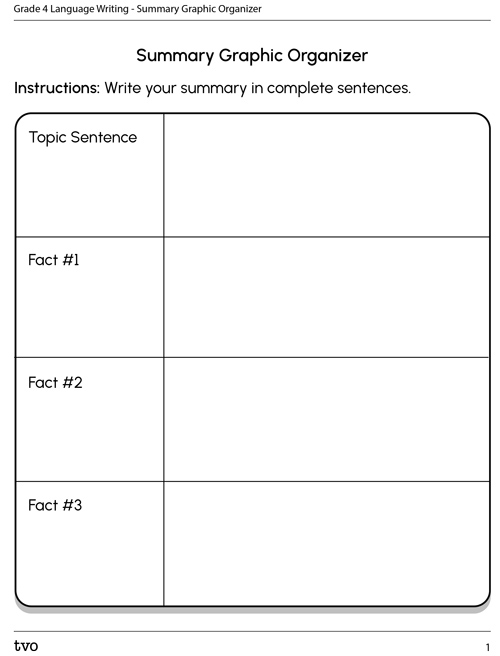
Part 7c: Summary graphic organizer (paragraph frame)
For each subtopic, you will write a paragraph about your subtopic, and include relevant facts and examples.
Complete the Summary Graphic Organizer in your notebook or using the following fillable and printable document for each paragraph.
Part 8: Review
You may need to go back and do more searches to find new or more specifics like supporting details (more facts, more examples, or you may need more sources to check your facts). Review your work at this time to confirm that your research information is sufficiently supported by enough examples and/or facts from more than one source.

Part 9: Draft
You may write your drafts on lined paper or electronically (speech-to-text), or audio-record.
Paragraphs
Now you are ready to write drafts for the paragraphs for the body of your report. Include a subtitle for each paragraph/subtopic. You may do this on lined paper or electronically or audio-record. This is where you write sentences from your jot notes. Make sure you include an introduction sentence about your subtopic, and a conclusion sentence for each paragraph. In your draft, include the subheading (so you don’t forget it when you publish).
This is also a good time to think about or gather images, photographs and/or labelled diagrams would be suitable to include beside, or after each subtopic paragraph. For each image, write a caption that explains the image and its importance to your subtopic. Follow any direction given from an adult for the number of and/or any other required report features such as maps, charts or tables.
Introduction
You will then need to write an introduction to your report. The introduction has a subheading or subtitle also “Introduction.” The introduction is short and outlines what the topic and subtopics are about and ANY KEY findings, such as comparisons and/or cause and effect relationships detailed in your report paragraphs.
Conclusion
Next, write the conclusion to your report. The conclusion has a subheading or subtitle also “Conclusion.” The conclusion can state the significance or importance of your report research. For example, since there are only 7 species of remaining sea turtles left in the world, it is important to help advocate for the protection of their natural habitats (the oceans of our Earth, the beaches where the female sea turtles lay their eggs), and how we all need to be responsible stewards of the Earth.
Glossary
If you’ve been instructed to include a glossary for key terms and their definitions, this is also a good time to bold them or underline them in your rough draft and create the glossary list and their definitions.
Table of Contents
If your report is handwritten and 5-10 pages, you will need a Table of Contents listed which page each new subtopic starts. Leave the page numbering for the last publishing step if you are handwriting your report. If you are using an electronic document, you can easily edit the page numbers at the end of publishing.
Sources

Make a list of sources you used. You will probably need to include the website link or provided a bibliography (author, title, publisher, date, page numbers). Also include the sources for any photographs or art images, the photographer's or artist’s name(s), title of the images. If you wish, you can include yourself as a photographer or artist for your visual work.
Part 10: Revise
If and when possible, peer conference to confirm that your paragraphs make sense, the order of your subtopics in your report, the layout of your images, and your introduction and your conclusion. Also conference for spelling, correct use of nouns, use of present tense verbs, and 3rd person. Use the checklist for elements and features provided at the start of the Action section.
When possible, check in with a trusted adult to finalize any revisions before you write your final draft. Show all your work including your images and layout plan, your introduction, conclusion and if you have one, the table of contents. This is where you will make notes to include larger fonts and/or different font or print for your subtitles, and different fonts for captions. You may want to create a final draft before polishing your report for publishing. If you have a Glossary, you may want to bold or underline when the word first appears in your report.
Consolidation
Part 11: Publish
This is where you print your final draft, or write your polished copy to include different fonts and font sizes for the report title, subtitles/subheadings, captions and attach photos, images, labelled diagrams, and include use of colour to present your report in the order of title, table of contents if needed, introduction, body with images and captions, conclusion, glossary, sources. If your report has a table of contents, create a cover page.

Reflection
As you read through these descriptions, which sentence best describes how you are feeling about your understanding of this learning activity? Press the button that is beside this sentence.
I feel…
Now, record your ideas using a voice recorder, speech-to-text, or writing tool.
Discover More
Press ‘Discover More’ to extend your skills.
Discover MoreFollow the research process for research projects/assignments in other subjects strands within Science or Social Studies. What other subjects do you think you will follow and use this research process?