Minds On
Creating perspectives
Three-dimensional objects are recognizable and different from two-dimensional shapes because they are identifiable in several perspectives.
Perspectives have as much to do with art as they do with mathematics. Examine the image of a railway track. As the track gets further away the distance between the rails appears to get smaller. Yet, we know the tracks stay the same distance apart. This is an example of one-point perspective.

If you imagine an object traveling in space and disappearing into the distance – this is one-point perspective. That point where everything disappears is called the vanishing point.

A point behind a cube is labelled V P. Three dashed lines are drawn from this point to join with three of the corners of the back face of the cube.
One of the more common ways to draw an object (show its perspective) is to draw the object from a front view, called a cabinet projection.

An object made of cubes is drawn on dot paper from the front view. 6 cubes are visible. There is one cube with another behind it. There are three cubes stacked vertically behind the second cube, but the bottom cube isn’t visible. There are two cubes side by side to the right of the bottom cube.
Another perspective is called an isometric projection where you look at the object from a corner view.

An object made of cubes is drawn on dot paper from a corner view. In the centre, there are three cubes stacked vertically though you can only see the top two cubes. To the left there are two cubes in front of the bottom cube. To the right there are two cubes in front of the bottom cube.
"Investigate the following image, and imagine the cube as if it is a building sitting on a corner of a street. Imagine following the side to the left and the right towards two vanishing points in the distance. This is two-point perspective.

There are two vanishing points - one to the left and one to the right. There is a cube in front and halfway between the two points. There are dashed lines from each of the viewpoints to the four corners on the back left face and the back right face.
A little bit about perspective drawings:
- cannot show the back side, so some elements may be hidden.
- are better at representing straight edges than curves.
- may distort or misrepresent angles and lengths.
- preferred for illustrations, for example, from a builder
Student Success
Compare the cubes in these two perspectives.
Record your thinking using a device of your choice, on paper, or in your math journal.
- Can you identify the top, front, and side view of each object?
- Which sides or views are missing in each drawing?
- Describe the difference between single-point perspective and two-point perspective.

There are two diagrams depicting the two types of perspective diagrams. In the single point perspective, there is a vanishing point behind a cube from which three dashed lines are drawn to join with three of the corners of the back face of the cube. In the two-point perspective, there are two vanishing points - one to the left and one to the right. There is a cube in front and halfway between the two points. There are dashed lines from each of the viewpoints to the four corners on the back left face and the back right face.
Action
Creating three-dimensional figures
Activity one: Drawing one- and two-point perspectives.
Here’s an example of drawing using a one-point perspective. Notice all the lines move toward a vanishing point in the distance.

Try to represent a room with a bit of furniture from a one-point perspective. You can draw, record a detailed description, or use a virtual tool.
Press ‘A Room’ to reveal an example of a room drawn from one-point perspective.

A pink-painted room with a purple couch, a lamp, a plant, a coffee table, and a green and pink carpet from a one-point perspective.
Examine the following diagram and consider where lines could be added to show two-point perspective.

Press ‘Compare’ to reveal a sketch of the diagram with two vanishing points.
Your sketch should be similar to this one:

A diagram of a house with a rectangular base and a triangular prism roof, drawn from a two-point perspective. There are two points- one to the left and one to the right. There are dashed lines from each of the viewpoints to the four corners on the front and the back side of the house.
Activity two: Drawing with isometric dot paper
Isometric drawing helps to us to explore an image from different perspectives.
Consider a linking cube and how it might be drawn based on the angle presented.
Here’s a short video that shows how to draw a cube using isometric dot paper.
Draw the two sets of blocks shown below on isometric grid paper.
You may use the Isometric Dot Paper from the following printable document to complete this activity, a virtual tool, or you could record a detailed description using mathematical language.
Compare your results to the suggested answers.
Press the ‘Activity’ button to access Isometric Dot Paper.
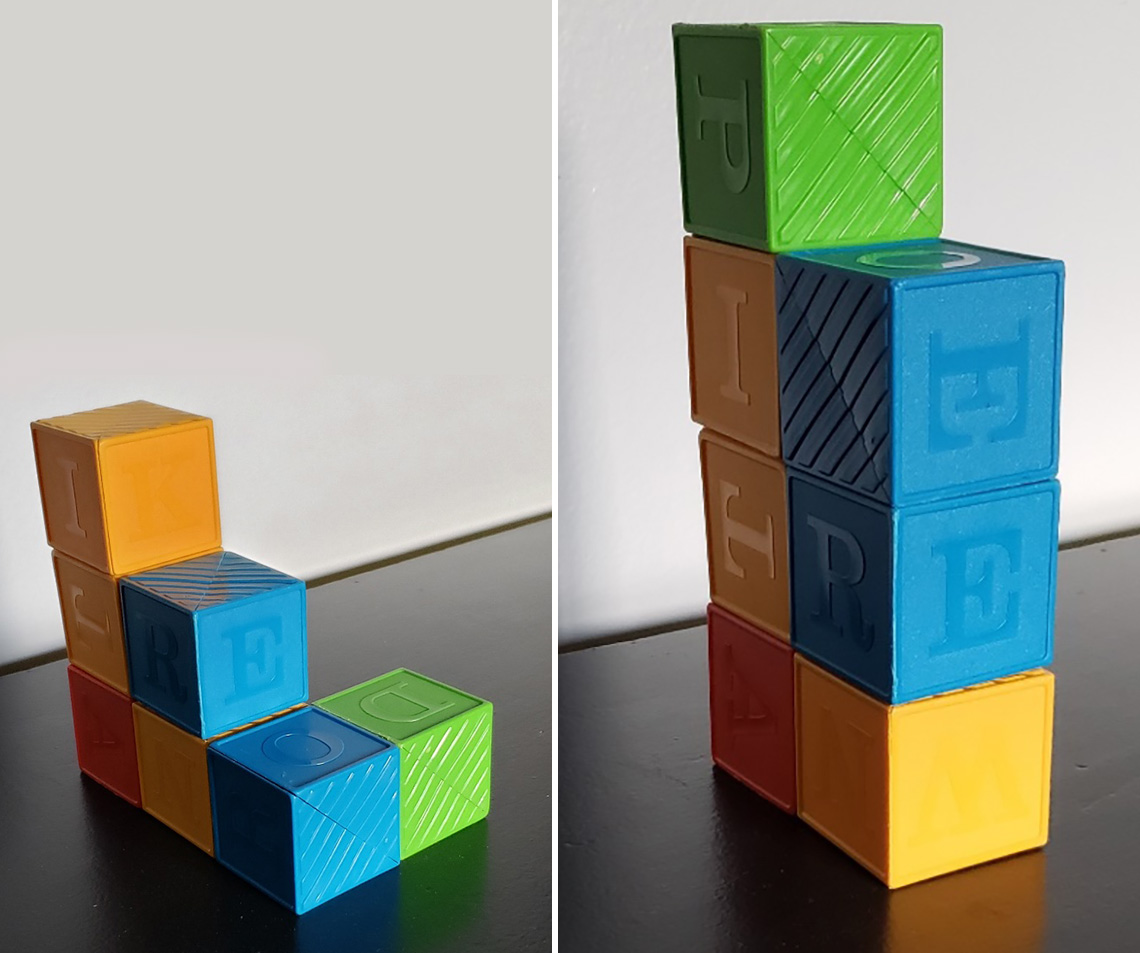
A row of 3 blocks with another block behind the right end of the three blocks. A row of 2 blocks are on top of the left 2 in the first row. One more block sits on top of the left end, making that side 3 blocks high. A second image has a stack of 4 blocks, with a stack of 3 blocks on the right side of the stack of 4.
Press ‘Drawings on isometric dot paper’ to reveal the two drawings of the blocks.
Drawings on isometric dot paper
 Description
A row of 3 blocks with another block behind the right end of the three blocks. A row of 2 blocks are on top of the left 2 in the first row. One more block sits on top of the left end, making that side 3 blocks high. A second image has a stack of 4 blocks, with a stack of 3 blocks on the right side of the stack of 4.
Activity three: Scale drawings
Drawings are used in the real world to display dimensions using a scale. Scales are used to communicate the proportions of the original object (i.e., relative distances).
For example, consider a drawing of a cube that is 1 cm × 1 cm × 1 cm on a page. It can have a larger real-life construction.
If the scale in a drawing is 1 cm : 1.5 m then the dimensions of that cube constructed in real life would equal 1.5 m × 1.5 m × 1.5 m.
When using scale, the scale drawing measurement is multiplied by the scale factor in order to determine the actual dimensions.

If the scale in this drawing is 1 cm : 2.5 m, what are the actual dimensions of the figure?
Record your thinking. Determine the lengths of all the outside line segments.
Press the "Dimensions" button to reveal the dimensions of the figure.

A row of two linking cubes. The rear row has two additional cubes stacked on top of it. The dimensions of the outside line segments of the top cube are . The dimensions of the outside line segments of the three stacked cubes is . The dimensions of the outside line segment of the bottom two cubes is . The dimensions of the outside line segment of the bottom cube is . The dimensions of the outside line segment of the two top cubes is .
Consolidation
Create a scene
Choose one of the following three activities to complete.
Press the 'Activity' button to access Isometric Dot Paper.
Choice 1:
Using a virtual or paper copy of isometric dot paper, create a simple street scene in a cube-based world using one-point or two-point perspective. If the scale of your drawing is 1 cm : 5 m, what are the dimensions of your drawing if they were re-created in real life?
Choice 2:
Using math manipulatives and isometric drawing paper (or using a virtual tool) illustrate the top, front and side views of a three-dimensional figure that you designed yourself or record a detailed description in an audio recording, using speech to text, on paper or on the computer.
Choice 3:
How well can you describe a three-dimensional shape using math language? Record a detailed description of a three-dimensional shape using mathematical language. If possible, have a partner produce a drawing from your description, or identify the shape.
Reflection
As you read the following descriptions, select the one that best describes your current understanding of the learning in this activity. Press the corresponding button once you have made your choice.
I feel...
Now, expand on your ideas by recording your thoughts using a voice recorder, speech-to-text, or writing tool.
When you review your notes on this learning activity later, reflect on whether you would select a different description based on your further review of the material in this learning activity.
Connect with a TVO Mathify tutor
Think of TVO Mathify as your own personalized math coach, here to support your learning at home. Press ‘TVO Mathify’ to connect with an Ontario Certified Teacher math tutor of your choice. You will need a TVO Mathify login to access this resource.
TVO Mathify (Opens in a new window)