Minds On
Examining three-dimensional objects
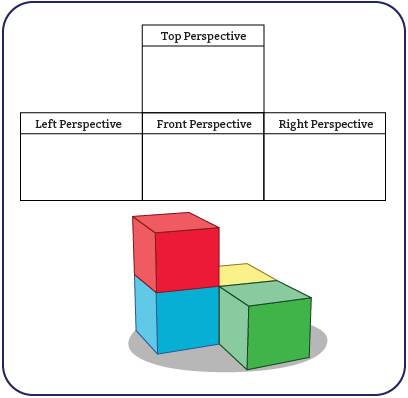
Examine the following three-dimensional object made of four linked cubes:

A three-dimensional object made of four linked cubes. Cube A is attached to the top face of Cube B. Cube B is attached to the left face of Cube C. Cube C is attached to the back face of Cube D.
Record a representation of the top, left, right, and front perspectives of the four linked cubes.
If you would like, you can complete this activity using TVO Mathify or a method of your choice. You can also use your notebook or the following fillable and printable document.
Press the ‘TVO Mathify' button to access this interactive whiteboard and the ‘Activity’ button for your note-taking document. You will need a TVO Mathify login to access this resource.
TVO Mathify (Opens in a new window) Activity (Open PDF in a new window)Perspective drawings
A perspective drawing represents the top, front, left, and right views of a three-dimensional object in one image.
The edges of a cube are always the same length, but in a perspective drawing, a cube’s angles (including the edges that show depth) are distorted and some of the cube’s faces will be hidden.
Action
Creating perspective drawings of three-dimensional objects
Perspective drawings are made of four perspective views that represent the top, front, left, and right views of a three-dimensional object as two-dimensional images.
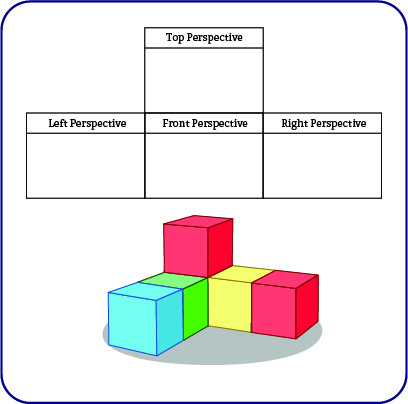
Examine the following three-dimensional object made of six linked cubes:

A three-dimensional object made of six linked cubes. Cube A is attached to the front face of cube B. Cube B is attached to the front face of cube C. Cube C is attached to the bottom face of cube D and the left face of cube E. Cube E is attached to the left face of cube F.
Record perspective views of the six linked cubes. How can you represent depth in your two-dimensional representations?
If you would like, you can complete this activity using TVO Mathify. You can also use your notebook or the following fillable and printable document.
Press the ‘TVO Mathify' button to access this interactive whiteboard and the ‘Activity’ button for your note-taking document. You will need a TVO Mathify login to access this resource.
TVO Mathify (Opens in a new window) Activity (Open PDF in a new window)Once you have completed your perspective views that represent depth, press ‘Suggested Answer’ to reveal one possible solution.
We can use thick black lines to represent depth in two-dimensional perspective views. You can label the visible sides of the object in each perspective to make the views clearer.

The top, front, left, and right perspective views of six linked cubes. The top perspective view consists of five squares. Square A is attached to the bottom edge of square B. Square B is attached to the bottom edge of square D. Square D has bolded edges, and is attached to the left edge of square E. Square E is attached to the left edge of square F. The top, right, bottom, and left sides of the top perspective view are labeled back, right, front, and left, respectively. The front perspective view consists of four squares. Square D is attached to the top edge of square A. Square A has bolded edges, and is attached to the left edge of square E. Square E is attached to the left edge of square F. The top, right, bottom, and left sides of the front perspective view are labeled top, right, bottom, and left, respectively. The left perspective view consists of four squares. Square D is attached to the top edge of square C. Square C has bolded edges, and is attached to the left edge of square B. Square B is attached to the left edge of square A. The top, right, bottom, and left sides of the left perspective view are labeled top, front, bottom, and back, respectively. The right perspective view consists of four squares. Square A is attached to the left edge of square B. Square B is attached to the left edge of square F. Square F has bolded edges and is attached to the bottom edge of square D. The top, right, bottom, and left sides of the right perspective view are labeled top, back, bottom, and front, respectively.
Using perspective views to create three-dimensional models
Use the following perspective views to create three-dimensional models.

Two sets of perspective views that represent three-dimensional models. The top view of model one consists of two squares. Square A is attached to the left edge of square C. Square C has bolded edges. The front view of model one consists of three squares. Square A is attached to the left edge of square B. Square B is attached to the bottom edge of square C. The left view of model one consists of two squares. Square A has bolded edges is attached to the top edge of square C. The top view of model two consists of four squares. Square A is attached to the left edge of square B. Square B is attached to the bottom edge of square C and the left edge of square D. The front view of model two consists of three squares. Square A is attached to the left edge of square B. Square B has bolded edges and is attached to the left edge of square D. The left view of model two consists of two squares. Square C is attached to the left edge of square A. Square A has bolded edges.
If you would like, you can complete this activity using TVO Mathify. You can also use your notebook or the following fillable and printable document.

Press the ‘TVO Mathify' button to access this interactive whiteboard and the ‘Activity’ button for your note-taking document. You will need a TVO Mathify login to access this resource.
TVO Mathify (Opens in a new window) Activity (Open PDF in a new window)Using perspective views to identify three-dimensional models
We are now going to use perspective views to identify the three-dimensional object that they represent.
Complete the Identifying Three-Dimensional Objects activity in your notebook or using the following fillable and printable document. If you would like, you can record your thoughts using a voice recorder, speech-to-text, or writing tool.
|
Identifying Three-Dimensional Objects |
|
|---|---|
|
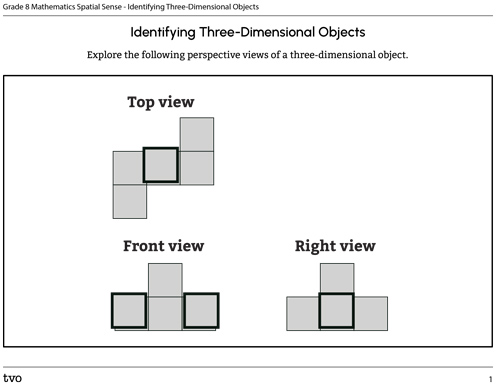
Explore the following perspective views of a three-dimensional object. |
|

Description
The top, front, and right perspective views of linked cubes. The top perspective view consists of five squares. Square A is attached to the bottom edge of square B. Square B is attached to the left edge of square D. Square D has bolded edges, and is attached to the left edge of square E. Square E is attached to the bottom edge of square F. The front perspective view consists of four squares. Square A is attached to the left edge of square C. Square C is attached to the bottom of square D and the left side of square E. Square A and square E both have bolded edges. The right perspective view consists of four squares. Square A is attached to the left edge of square E. Square E is attached to the bottom of square D and the left edge of square F. Square E has bolded edges. |
|
|
Review the following three-dimensional objects and select the object that the perspective views represent. |
|
|
1) 
Description
A three-dimensional object made of seven linked cubes. Cube A is attached to the front face of cube B. Cube B is attached to the left side of cube C. Cube C is attached to the bottom face of cube D and the left face of cube F. Cube D is attached to the bottom face of Cube E. Cube F is attached to the front face of cube G. |
2) 
Description
A three-dimensional object made of six linked cubes. Cube A is attached to the front face of cube B. Cube B is attached to the left side of cube C. Cube C is attached to the bottom face of cube D and the left face of cube E. Cube E is attached to the front face of cube F. |
|
3) 
Description
A three-dimensional object made of seven linked cubes. Cube A is attached to the front face of cube B. Cube B is attached to the bottom of cube C and the left side of cube D. Cube D is attached to the left side of cube E. Cube E is attached to the bottom face of cube F and the front face of cube G. Cube E is attached to the front face of cube F. |
4) 
Description
A three-dimensional object made of nine linked cubes. Cube A is attached to the bottom of cube B and front face of cube C. Cube C is attached to the bottom of cube D and the left side of cube E. Cube E is attached to the left side of cube F. Cube F is attached to the bottom face of cube G and the front face of cube H. Cube I is attached to the back face of cube G and the top face of cube H. |
|
Which object do the perspective views represent? |
|
|
How were you able to determine which three-dimensional object was represented by the perspective views? |
|
Press the Activity button to access the Identifying Three-Dimensional Objects.
Activity (Open PDF in a new tab)Press ‘Answer’ to reveal the solution.
Consolidation
Create your name in three dimensions
Imagine that your name was represented using cubes. It might look like this:

Create perspective views of your initials as if the letters were represented using cubes.
If you would like, you can complete this activity using TVO Mathify or a method of your choice. You can also use your notebook or the following fillable and printable document.
Press the ‘TVO Mathify' button to access this interactive whiteboard and the ‘Activity’ button for your note-taking document. You will need a TVO Mathify login to access this resource.
TVO Mathify (Opens in a new window) Activity (Open PDF in a new window)Reflection
As you read the following descriptions, select the one that best describes your current understanding of the learning in this activity. Press the corresponding button once you have made your choice.
I feel...
Now, expand on your ideas by recording your thoughts using a voice recorder, speech-to-text, or writing tool.
When you review your notes on this learning activity later, reflect on whether you would select a different description based on your further review of the material in this learning activity.
Press ‘Discover More’ to extend your skills.
Discover MoreThink about careers that might require using three-dimensional models to examine different perspective views.
Research to explore how many of these careers you can find.
- Which career interests you the most? Why?
Connect with a TVO Mathify tutor
Think of TVO Mathify as your own personalized math coach, here to support your learning at home. Press ‘TVO Mathify’ to connect with an Ontario Certified Teacher math tutor of your choice. You will need a TVO Mathify login to access this resource.
TVO Mathify (Opens in a new window)