Minds On
City of Lethbridge’s water treatment
Let’s explore an example of the municipal water treatment process before we move onto coding.
Check out this video entitled “City of Lethbridge’s Water Treatment Process” to learn more about municipal water treatment.
The municipal water treatment process
Check your knowledge! The following cards show the parts of the municipal water treatment process as described in the previous video. Put the parts of the process in each answer box in the correct order.
The final step: distribution
Now that you have completed the activity, you might wonder about the final step in the process, which is water distribution. Distribution involves pumping water out of the treatment plant so that it can be distributed through below-ground pipes connected to every home and business.
Portfolio
Portfolio
What are some unanswered questions or wonderings that you have about these topics?
Record these ideas orally, digitally, or in another method of your choice.
Action
Global connection
The United Nations (UN) is a group of many countries from around the world that have come together to create a better future for people and the environment. They have created 17 goals called the Sustainable Development Goals.
This learning activity is connected to Goal #6: Clean Water and Sanitation. This means everyone should have Safe drinking water and sanitation. Having clean water affects not only health but things like reducing poverty, having food security, and having a sustainable ecosystem.
Student Success
Think!
Do all communities have access to clean water?
What are some efforts that local and global organizations can make to achieve this goal?
How does municipal water treatment promote sustainability in a community?
Record your ideas in a method of your choice. Share your ideas with a partner, if possible.
Note to teachers: See your teacher guide for collaboration tools, ideas and suggestions.
Coding activity
There exist numerous methods and technologies for treating water.
Your task is to use code to design a program that shows water moving through each step of the municipal water treatment process, with specific details about each step along the way.
Your goals in this activity are:
- design a program that will serve as an engaging quiz
- deliver an important, positive message about water treatment
- challenge the player to apply their knowledge and understanding in an interactive way
- provide an opportunity for the player to check their understanding of on what happens to the water during each step in the municipal water treatment process
Using the information that you have gained in the Minds On activity, and by following the instructions to come, you should create questions (e.g., select yes/no, choose true/false, etc.) to quiz the player of the game.
Let’s code!
Coding is a computer programming language that can be used to model concepts and design programs.
Scratch is a coding application that uses blocks to create code. Let’s learn more about how we might use Scratch.
Student Success
Let's think about code!
When you start your own project in Scratch, you will be making code using blocks. A block is a small piece of code that appears to be a puzzle piece or a building block. You can use blocks to build your own code. Each kind of block controls an action. There are 9 kinds of blocks available at the start! As you learn more, you may find other types of blocks to add to your code.
Each block describes an action that is performed by a character. An action is like an instruction. A character can be a sprite or a backdrop. A sprite is an image of a person or object. A backdrop is an image of a background or a place. Your code creates actions that affect a sprite or a backdrop. You can choose if you are using a sprite or a backdrop.
As you make your code, you are connecting blocks to make a code block. Your block of code is known as a code block or a script! The space where you build your code is also known as the scripts area. Press and place each of your blocks into the centre area to make your code. When you activate your code, it is known as running your code.
To start creating code, press on a block and move it to the center area. Press and snap or place your next block under your current block. Now you have created a code block!
Once you have made a code block, your code should perform an action. The action can be made by a character like a sprite or a backdrop. You can make as many characters as you like. You can make different coding instructions for each one!
You can change the order of your blocks or delete a block at any time. You can also copy or duplicate a section of your code. To copy code, right-click on the first block you want to copy. It will copy all of the blocks that follow it. Connect your copied code to the bottom of the code block you want to it added to!
Note to teachers: See your teacher guide for collaboration tools, ideas and suggestions.
To explore some possible code elements and blocks that you may come across in this learning activity, press on the following tabs:
A sprite is a character that carries out the actions that you make with your code.
The backdrops can also be changed by your code. Some blocks change what the backdrop will do!
A motion block makes a sprite move! You can move, turn or ask a sprite to move to a certain position.
A looks block changes how a sprite looks! You can choose costumes for each of your sprites.
A sound block make audio, or a sound. You can use the audio that is included in Scratch. You can also record your own sounds!
An events block is the start button for a code block. To decide when you want your code to run or start, place an events block at the beginning of your code. Your events block is how you decide when your code will start!
Your events block has to be your first block because it starts your code. You can choose how you want your code to start!
A control block is a block that controls when an action happens. A control block can change the order and timing of an action. You can use control blocks to wait, to repeat and even to loop your code!
A sensing block is a block that helps characters work with each other.
For example, what happens if you have two sprites ask each other a question?
An operators block is a block that adds math to your code.
Operators blocks can be tricky to put together.
Before you can put an operators block in your code block, you have to add another block! You could use a sensing block or a variables block. You will need to fill any blank spaces that are part of your operators block. Press and drag a sensing or variables block to snap into any blank spaces. Now you can put your operator block in your code block!
A variables block is a block that keep track of information. A variables block helps to change how to code is run each time. It can be used to create a challenge in a game!
My Blocks is a special area to keep your very own blocks! You can save your own blocks in the My Blocks category.
Now you have explored what kind of blocks you can use in Scratch!
Try It
Try it
Access the following link to explore the Municipal Water Treatment program on Scratch(Opens in a new window).
This program simulates six different stages in the water treatment process: Screening, Coagulation, Clarification, Filtration, UV Disinfection and Distribution. Each stage is represented by three different sprites: Water, Pipe and Mechanism. Throughout the process, the player will answer questions about each stage.
Press the following tabs to access how to navigate each step of the game-building process in Scratch
Access the following Scratch(Opens in a new window) link to explore the code
Explore the first stage of the water treatment process. Press SEE INSIDE to access the code, then press the screening water sprite.
Press (CODE) to learn more about the (blocks used to code the screening water sprite)
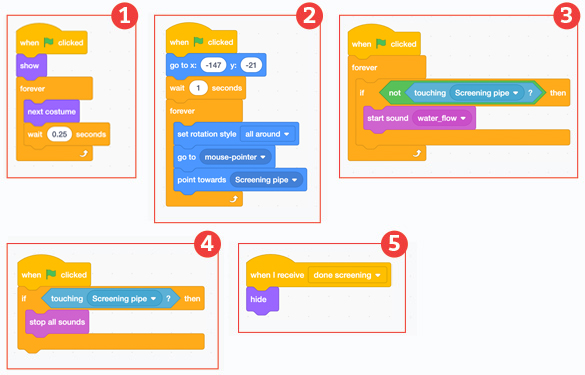
The Scratch code script sequences for the screening water sprite are as follows:
Script 1: When green flag clicked, show forever repeat the following sequence: next costume, wait 0.25 seconds.
Script 2: When green flag clicked, go to x: -147 y: -21, wait 1 seconds. Forever repeat the following sequence: set rotation style all around, go to mouse-pointer, point towards Screening pipe.
Script 3: When green flag clicked, forever repeat the following sequence: if not touching Screening pipe? then, start sound water_flow.
Script 4: When green flag clicked, if touching Screening pipe then stop all sounds.
Script 5: When I receive done screening, hide.
Scratch Tips:
- FOREVER LOOP: Ensures the water flow “animation” continues after the program starts
- SET ROTATION STYLE and POINT TOWARDS: Sets up the water to follow the mouse pointer in the frame, as well as the shape and direction of the pipe
- IF/THEN, TOUCHING and NOT TOUCHING: Ensures that the player moves the water sprite through the pipe to the end of that stage of water treatment, because it will make the “water_flow” sound only when touching the pipe (otherwise, it stops).
- WHEN I RECEIVE: Hides the water sprite in the frame for this specific stage before going onto the next stage.
Access the following Scratch(Opens in a new window) link to explore the code
Press the screening pipe sprite.
Press (CODE) to learn more about the (blocks used to code the screening pipe sprite):
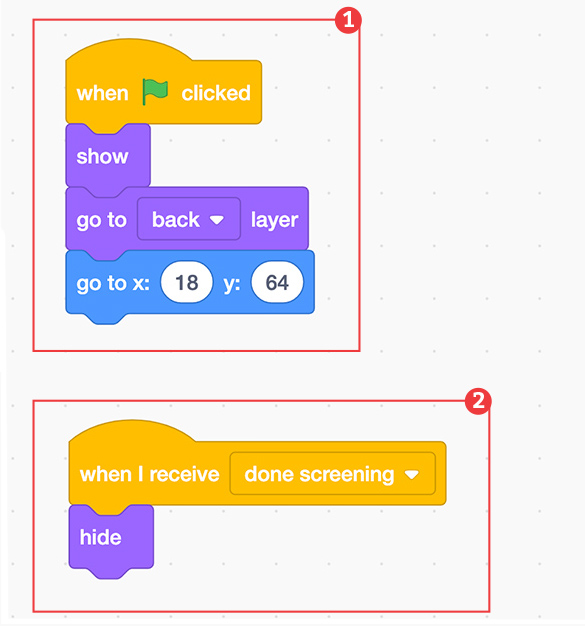
The Scratch code script sequences for the screening pipe sprite are as follows:
Script 1: When green flag clicked, show go to back layer, go to x: 18, y: 64.
Script 2: When I receive done screening, hide.
Scratch Tips:
- GO TO BACK LAYER: This ensures that the “Screening water” sprite can be seen in front of the pipe. This makes it appear as though the water is flowing through it (like a cross-section). Also, this sets it in the correct position (in line with the water source on the left of the frame).
- WHEN I RECEIVE (MESSAGE): Hides the pipe sprite in the frame for this specific stage before going onto the next stage
Access the following Scratch(Opens in a new window) link to explore the code
Press the screening sprite to access the code. This is how we will create the first quiz question for the player.
Press (CODE) to learn more about the (blocks used to code the question for the screening sprite):
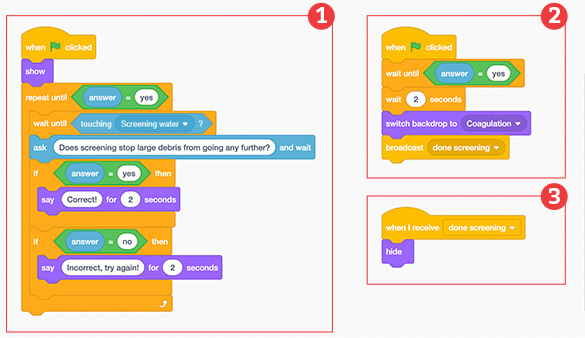
The Scratch code script sequences for the screening pipe sprite read as follows:
Script 1: When green flag clicked, show forever repeat the following sequence until answer = yes: wait until touching Screening water? Ask Does screening stop large debris from going any further? and wait. If answer = yes then, say “Correct!” for two seconds. If answer = no then, say “Incorrect, try again!” for two seconds.
Script 2: When green flag clicked, wait until answer = yes, wait 2 seconds, switch backdrop to Coagulation, broadcast done screening.
Script 3: When I receive done screening, hide.
Scratch tips:
- WAIT UNTIL TOUCHING: when the water sprite is touching the “Screening” sprite (at the end of the pipe) will it prompt the player with the question
- ASK and WAIT: We need to make sure that the answers for “Correct” and “Incorrect” provide the appropriate output/feedback for the player
- SWITCH BACKDROP TO: When the player types in the right answer, this script ensures that they move onto the next stage of the water treatment process.
- BROADCAST: The broadcast block is what sends the message to hide all of the sprites from the current stage before moving onto the next one.
- WHEN I RECEIVE…HIDE: Ensures that this sprite is hidden before moving onto the next stage.
Explore the code for the next five stages of the water filtration process. How are the scripts similar and different?
Press ‘Hint’ to access a possible answer.
Most of the code has been duplicated for each stage. Instead of using “when the green flag clicked” blocks, each script begins with “when I receive” blocks. These blocks move the action from one stage to the next.
Your turn
Press the following tabs to access instructions for your next two tasks.
Access the following Scratch(Opens in a new window) link to explore the code
For each of the six stages of the Water Treatment process, create a new quiz question for the player to answer.
Ensure that the If/Then ANSWER = block matches the correct output or feedback in the SAY block.
If using Scratch, the quiz question must include an answer that has two possible solutions, such as True/False, Yes/No, etc.
Scratch code for quiz questions

Access the following Scratch(Opens in a new window) link to explore the code
Add a score counter to keep track of the number of correct answers.
Press VARIABLES: Create a new variable called “Score”.
Press the Score variable to display it.
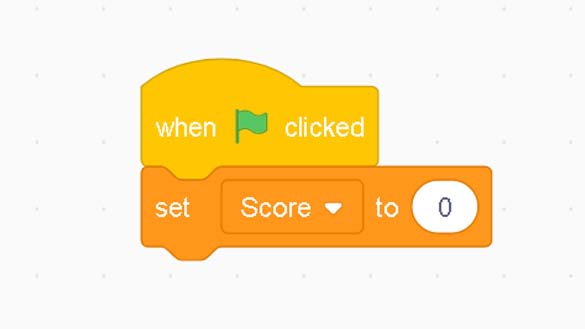
Ensure that the score is set to O every time the game begins.
EVENTS: Press WHEN GREEN FLAG CLICKED
VARIABLE: Set score to 0
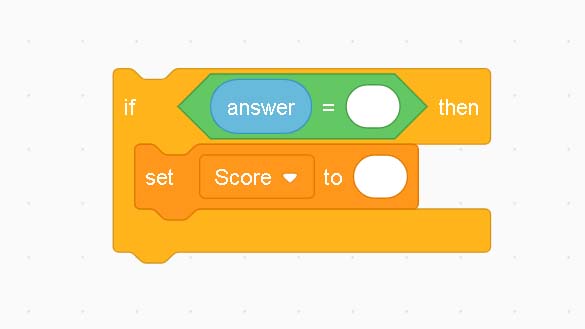
Explore the following image of a Scratch sequence.
For each question, nest the following sequence underneath the two possible answers:
If answer = then
Set score to
Explore the following image of the Scratch code for score counter.
For each stage of the water treatment process, increase the score by 1 point.
Ensure that the If/Then ANSWER = block matches the correct answer for each quiz question.
Consolidation
Test it out!

Before passing this game on to a partner (if possible), make sure to examine the following interactive checklist to guide and test your code out:
Water treatment game
I made sure to:
Portfolio
Portfolio reflection
Consider preparing answers to the following five reflection questions to add to your portfolio.
- What did you enjoy about coding?
- What is one thing you want to continue to explore or learn more about?
- What challenges did you face when designing your coding? What might you do differently next time?
- How do you think water gets from a source (lake, river, or well) to the tap in your home or school – where you live? Create a visual (drawing, piece of art, diagram), written or oral description that shows this connection.
- How many skilled trades are required to support the design, construction and functionality of the municipal water treatment process? Conduct a brief search to discover some of the skilled trades involved. Can you name a few?
Reflection
As you read the following descriptions, select the one that best describes your current understanding of the learning in this activity. Press the corresponding button once you have made your choice.
I feel…
Now, expand on your ideas by recording your thoughts using a voice recorder, speech-to-text, or writing tool.
When you review your notes on this learning activity later, reflect on whether you would select a different description based on your further review of the material in this learning activity.