Minds On
Natural or human-made?
A structure is a supporting framework that holds a load and has a definite size, shape, and purpose.
Let’s explore the following examples of structure. For each image, select the best answer from the multiple choice options.
For each structure, select what made it.
For each structure select what it could be used for.
Action
Wildlife bridges
Bridges are built to help humans and animals travel over rivers, train tracks, or roadways. These things are obstacles- that means they get in the way of something moving freely from one place to the next. Humans build bridges for walking or driving a vehicle over these obstacles.
Throughout human history, there have been lots of innovations and creativity in the way of designing bridges to ensure humans can travel safely.
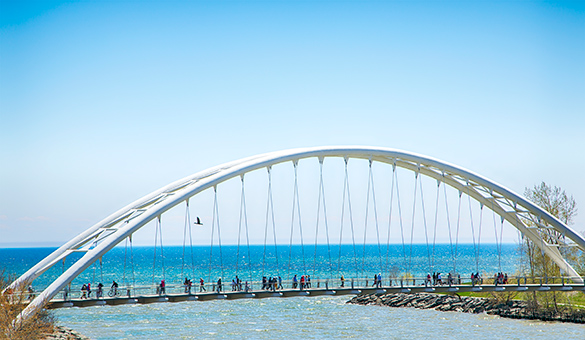
The Humber Bay Arch Bridge for pedestrians and bicycles in Toronto, Ontario
There are many reasons animals may need to move to a different location. They might move to hunt for food, to get away from forest fires or to look for water. Sometimes animals move to escape predators.
New roads can affect where animals can live and travel to safely. When roads and highways are built, they damage the landscape and cause many animals to move out of the area. This is also known as habitat destruction.
Habitat destruction may also prevent access to food and water resources or cause harm to the organisms including plants and animals.
To help protect animals as they travel across busy highways and roads, bridges covered in natural materials are being built so they look like the landscape. These bridges are one example of what is called a wildlife crossing.
Explore the two following images of highways.
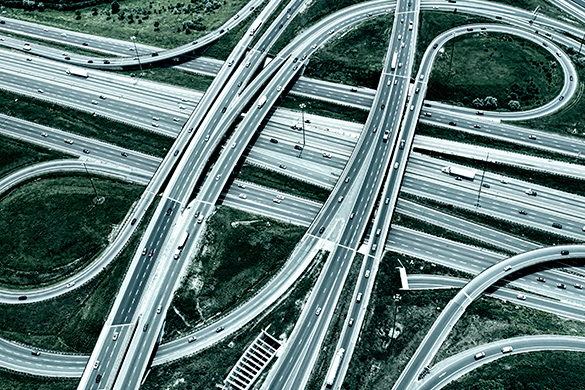
Highway interchange in Toronto, Ontario
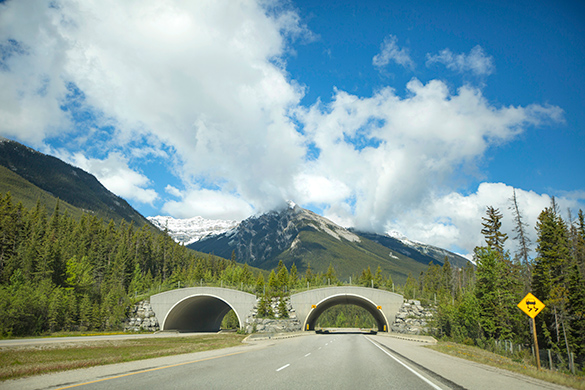
Wildlife bridge in Banff, Alberta
Wildlife bridge crossings make it easier for animals to move between habitats and reduce or avoid collisions between vehicles and animals.
Let’s explore coding with Scratch!
Coding is a computer programming language that can be used to model concepts and design programs.
Scratch is a coding application that uses blocks to create code. Let’s learn more about how
we might use Scratch.
Student Success
Let's think about code!
When you start your own project in Scratch, you will be making code using blocks. A blocks is a small piece of code that appears to be a puzzle piece or a building block. You can use blocks to build your own code. Each kind of block controls an action. There are 9 kinds of blocks available at the start! As you learn more, you may find other types of blocks to add to your code.
Each block describes an action that is performed by a character. An action is like an instruction. A character can be a sprite or a backdrop. A sprite is an image of a person or object. A backdrop is an image of a background or a place. Your code creates actions that affect a sprite or a backdrop. You can choose if you are using a sprite or a backdrop.
As you make your code, you are connecting blocks to make a code block. Your block of code is known as a code block or a script! The space where you build your code is also known as the scripts area. Press and place each of your blocks into the centre area to make your code. When you activate your code, it is known as running your code.
To start creating code, press on a block and move it to the center area. Press and snap or place your next block under your current block. Now you have created a code block!
Once you have made a code block, your code should perform an action. The action can be made by a character like a sprite or a backdrop. You can make as many characters as you like. You can make different coding instructions for each one!
You can change the order of your blocks or delete a block at any time. You can also copy or duplicate a section of your code. To copy code, right-click on the first block you want to copy. It will copy all of the blocks that follow it. Connect your copied code to the bottom of the code block you want to it added to!
To explore some possible code elements and blocks that you may come across in this learning activity, press on the following tabs:
A sprite is a character that carries out the actions that you make with your code.
Sprite
The backdrops can also be changed by your code. Some blocks change what the backdrop will do!
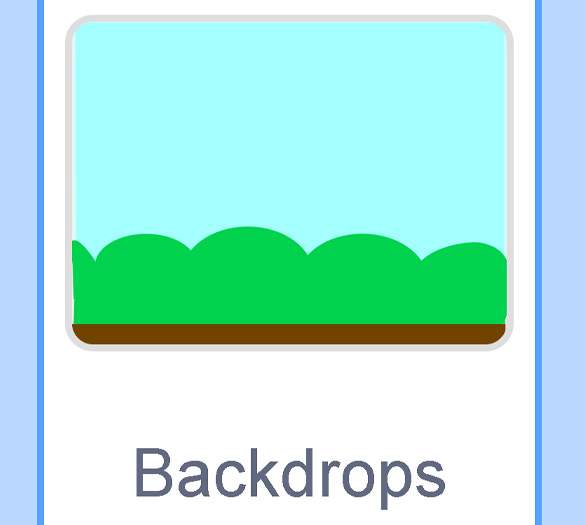
Backdrops
A motion block makes a sprite move! You can move, turn or ask a sprite to move to a certain position.
Motion
A looks block changes how a sprite looks! You can choose costumes for each of your sprites.
Looks
A sound block make audio, or a sound. You can use the audio that is included in Scratch. You can also record your own sounds!
Sound
An events block is the start button for a code block. To decide when you want your code to run or start, place an events block at the beginning of your code. Your events block is how you decide when your code will start!
Your events block has to be your first block because it starts your code. You can choose how you want your code to start!

Events
A control block is a block that controls when an action happens. A control block can change the order and timing of an action. You can use control blocks to wait, to repeat and even to loop your code!

Control
A sensing block is a block that helps characters work with each
other.
For example, what happens if you have two sprites ask each other a
question?
Sensing
An operators block is a block that adds math to your code.
Operators blocks can be tricky to put together.
Before you can put an operators block in your code block, you have to add another block! You could use a sensing block or a variables block. You will need to fill any blank spaces that are part of your operators block. Press and drag a sensing or variables block to snap into any blank spaces. Now you can put your operator block in your code block!

Operators
A variables block is a block that keep track of information. A variables block helps to change how to code is run each time. It can be used to create a challenge in a game!
Variables
My Blocks is a special area to keep your very own blocks! You can save your own blocks in the My Blocks category.
My Blocks
Now you have explored what kind of blocks you can use in Scratch!
It’s time to code a wildlife bridge!
How might you create a safe travel passage for wildlife?
Let’s try to use Scratch to build a “wildlife crossing” program.
If you are not able to access Scratch, use the images and descriptions to help you complete this activity using a method of your choice.
We’ll start the project using only sprites, a backdrop, and a few scripts of code – you will build the rest of the scripts yourself with the help of the steps and images below.
Press the following tabs to access some tips about parts of Scratch that you need to know.
The green flag at the top of the screen will execute (run) all the code that contains the blocks entitled when green flag clicked.
We will also be using the “Events” blocks, which are blocks entitled “when…” to start scripts, such as:
- when this sprite is clicked
- when … key is pressed
We will be using some Motion blocks, too. These blocks give the “Sprite” a direction and distance for movement.
Go to the following link to begin creating this project in Scratch on your own device:
Scratch(Opens in a new window)This Scratch project is a wildlife bridge. There are four animals that can use the wildlife bridge to safely cross over the highway: a bear, a fox, a hare, and a mouse. Each of these animals is a sprite. Each sprite has its own script (set of instructions for how to move).
Let’s try out the program!
Bear sprite
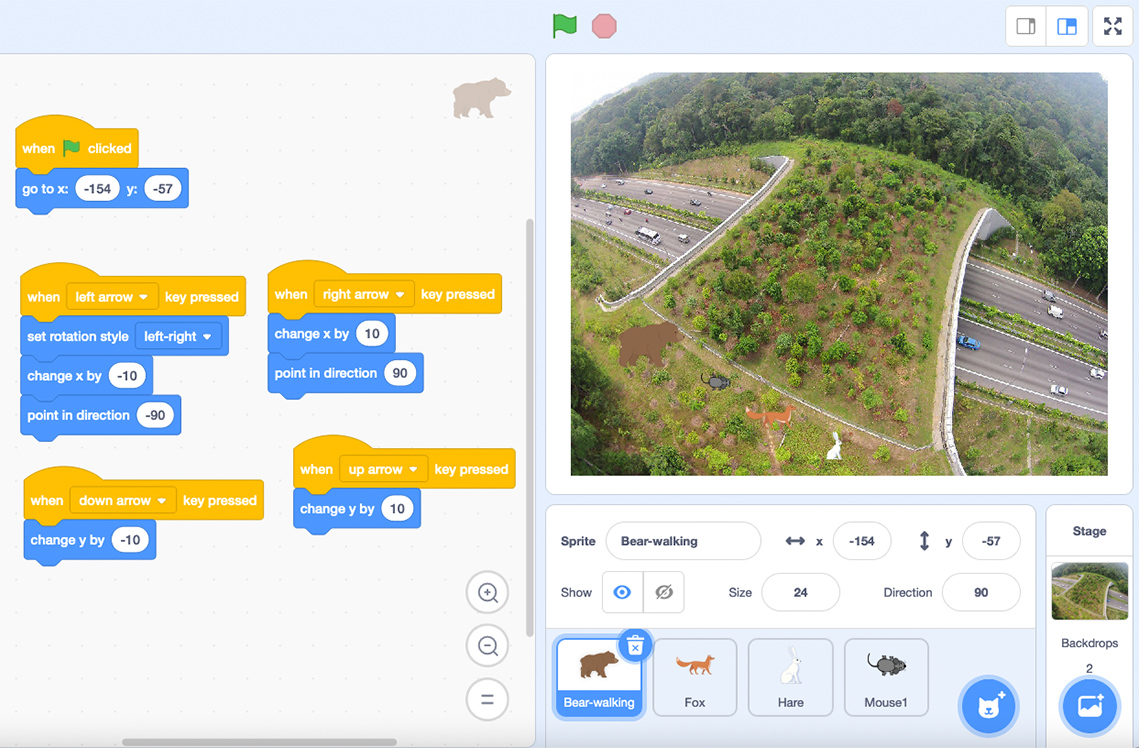
Choose the sprite that is the bear. The script contains the ‘when green flag clicked’ blocks. When the green flag is clicked, the bear returns to its original spot. The scripts for the bear allow you to use the up and down and left and right keys on your keyboard to get the bear across the bridge. The scripts for the bear and the scripts for the fox are already done, so we will be building scripts for the hare sprite.
Try out the Bear sprite in the program!
A Scratch program screenshot with five scripts in the script area for the Bear sprite.
The first script is the "when green flag clicked" block. It reads: When green flag clicked, Go to x: -154 y:–57.
The second script has three blocks. It reads: When left arrow key pressed, Set rotation style left-right, Change x by -10, Point in direction -90.
The third script has two blocks. It reads: When right arrow key pressed, Change x by 10, Point in direction 90.
The fourth script has one block. It reads: When down arrow key pressed, Change y by -10.
The fifth script has one block. It reads: When up arrow key pressed, Change y by 10.
Fox sprite
If you click on the Sprite “Fox,” you will access the script (set of instructions) that gets the fox across the bridge.
- How are the scripts for the Fox sprite and the Bear sprite different?
- How are they the same?
Record your ideas using a method of your choice.
Press ‘Sample Response’ to access one possible answer.
The Bear sprite has five scripts and the Fox sprite has two scripts. Both scripts begin by using the x and y coordinates to bring the sprite back to its original position on one side of the bridge. The Bear sprite moves across the bridge in smaller steps using the up, down, left, right arrow keys. The Fox sprite moves across the bridge in larger steps using the f key. Both scripts include code to turn (or rotate) the sprite in different directions.
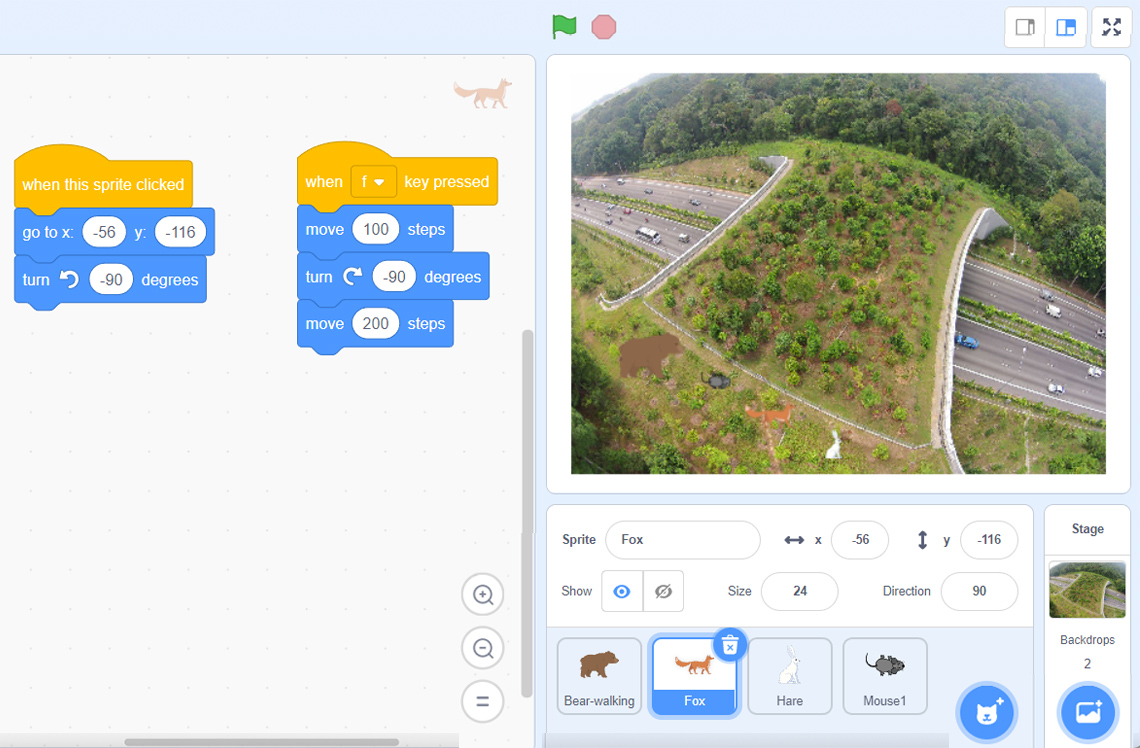
Try out the Fox sprite!
A Scratch program screenshot with two scripts in the script area for the Fox sprite.
The first script has two blocks. It reads: When this sprite clicked, Go to x: -56 y: -116, Turn counter-clockwise -90 degrees.
The second script has three blocks. It reads: When f key pressed, Move 100 steps, Turn clockwise -90 degrees, Move 200 steps.
Hare sprite
Now let’s write the scripts for the “Hare” sprite.
Start by clicking on the Hare sprite. Let’s begin by bringing the Hare sprite to its original position on one side of the bridge.

Hare script 1
Now we need a second script to move the Hare. Use the “when … key pressed” Event block to start moving the Hare. What letter could you use for hare?

Hare script 2: Step 1
Decide how far the Hare needs to travel. Enter the number in the script for Hare or record your number digitally, orally, or in print.

Hare script 2: Step 2
What happened? Did the Hare fall off the bridge? How might you solve this problem?
Go back to the script for Bear and Fox. Is there something there that could be useful?
Press ‘Hint’ to access some help.
How will you move the Hare?
You can try moving the Hare with your mouse to see what coordinates it will land on and set the Motion block to move it there.
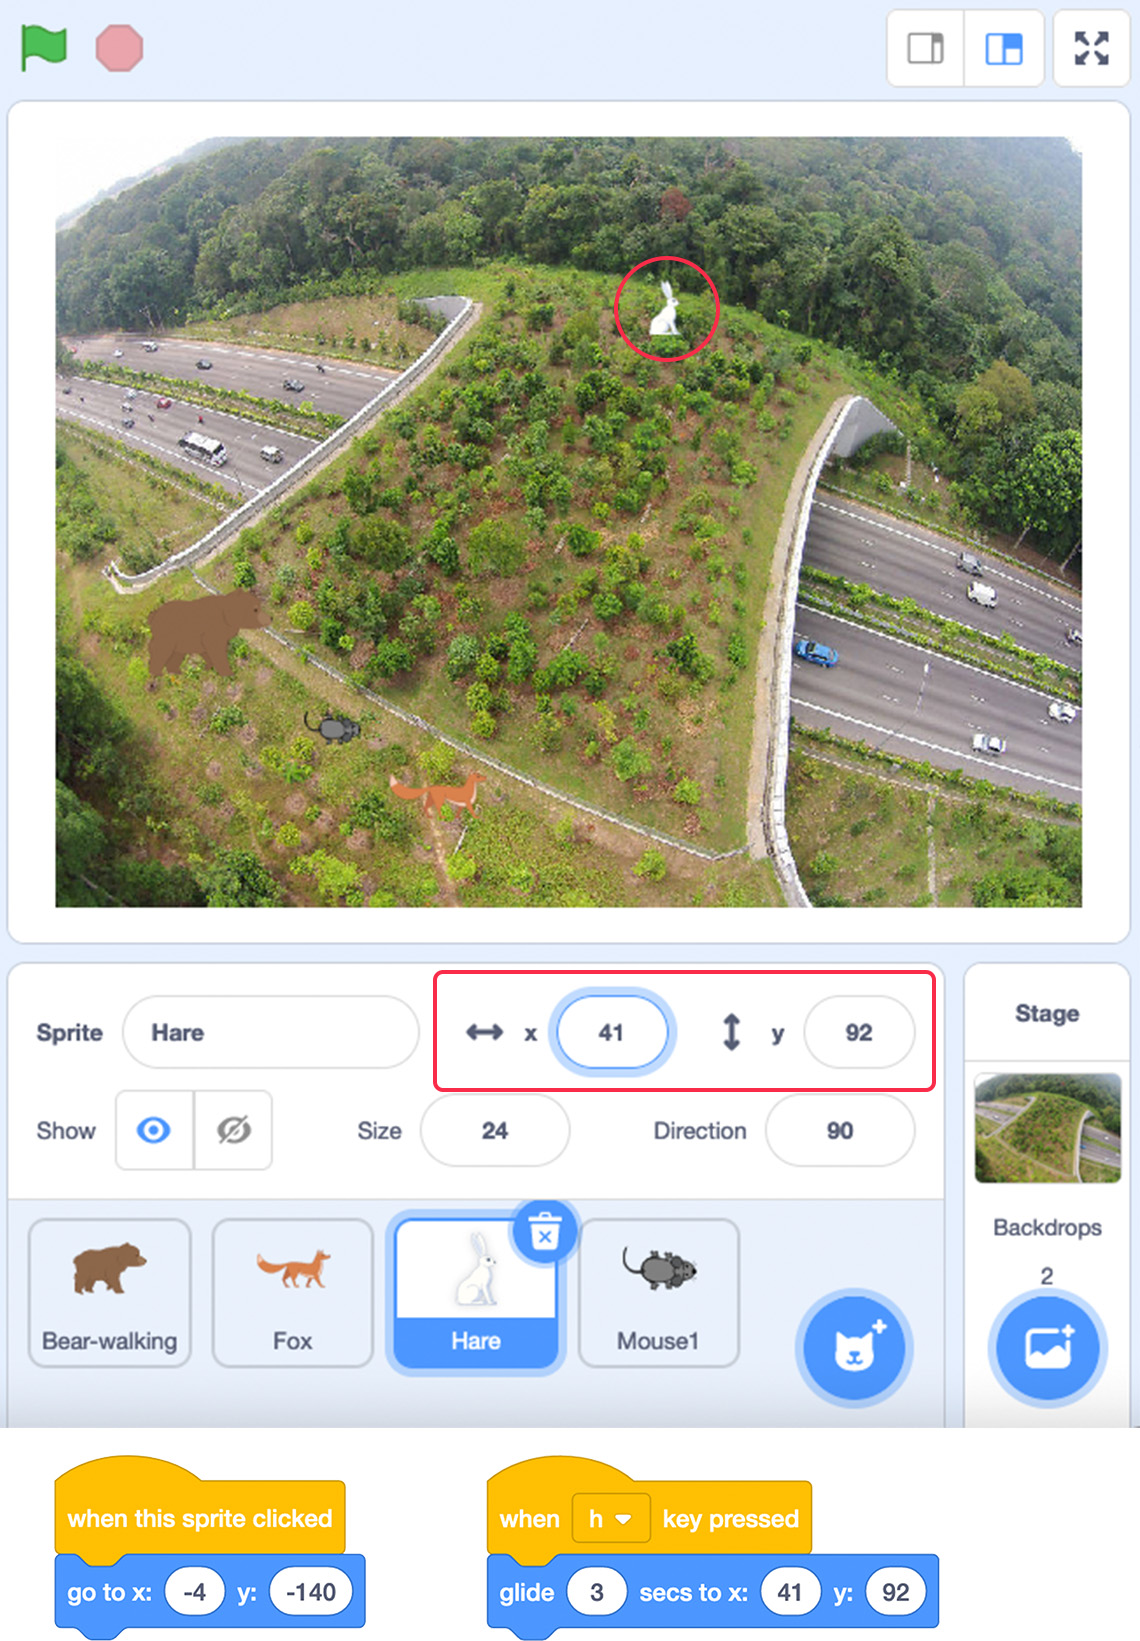
Hare scripts 1A and 2A
A Scratch program screenshot with two scripts for the Hare sprite.
The first script is the following: When this sprite clicked, Go to x: -4 y: -140.
The second script is the following: When h key is pressed, Glide 3 secs to x:41 y:92.
Or if your other animals are already on the other side of the bridge, you can make your Hare go to one of them.
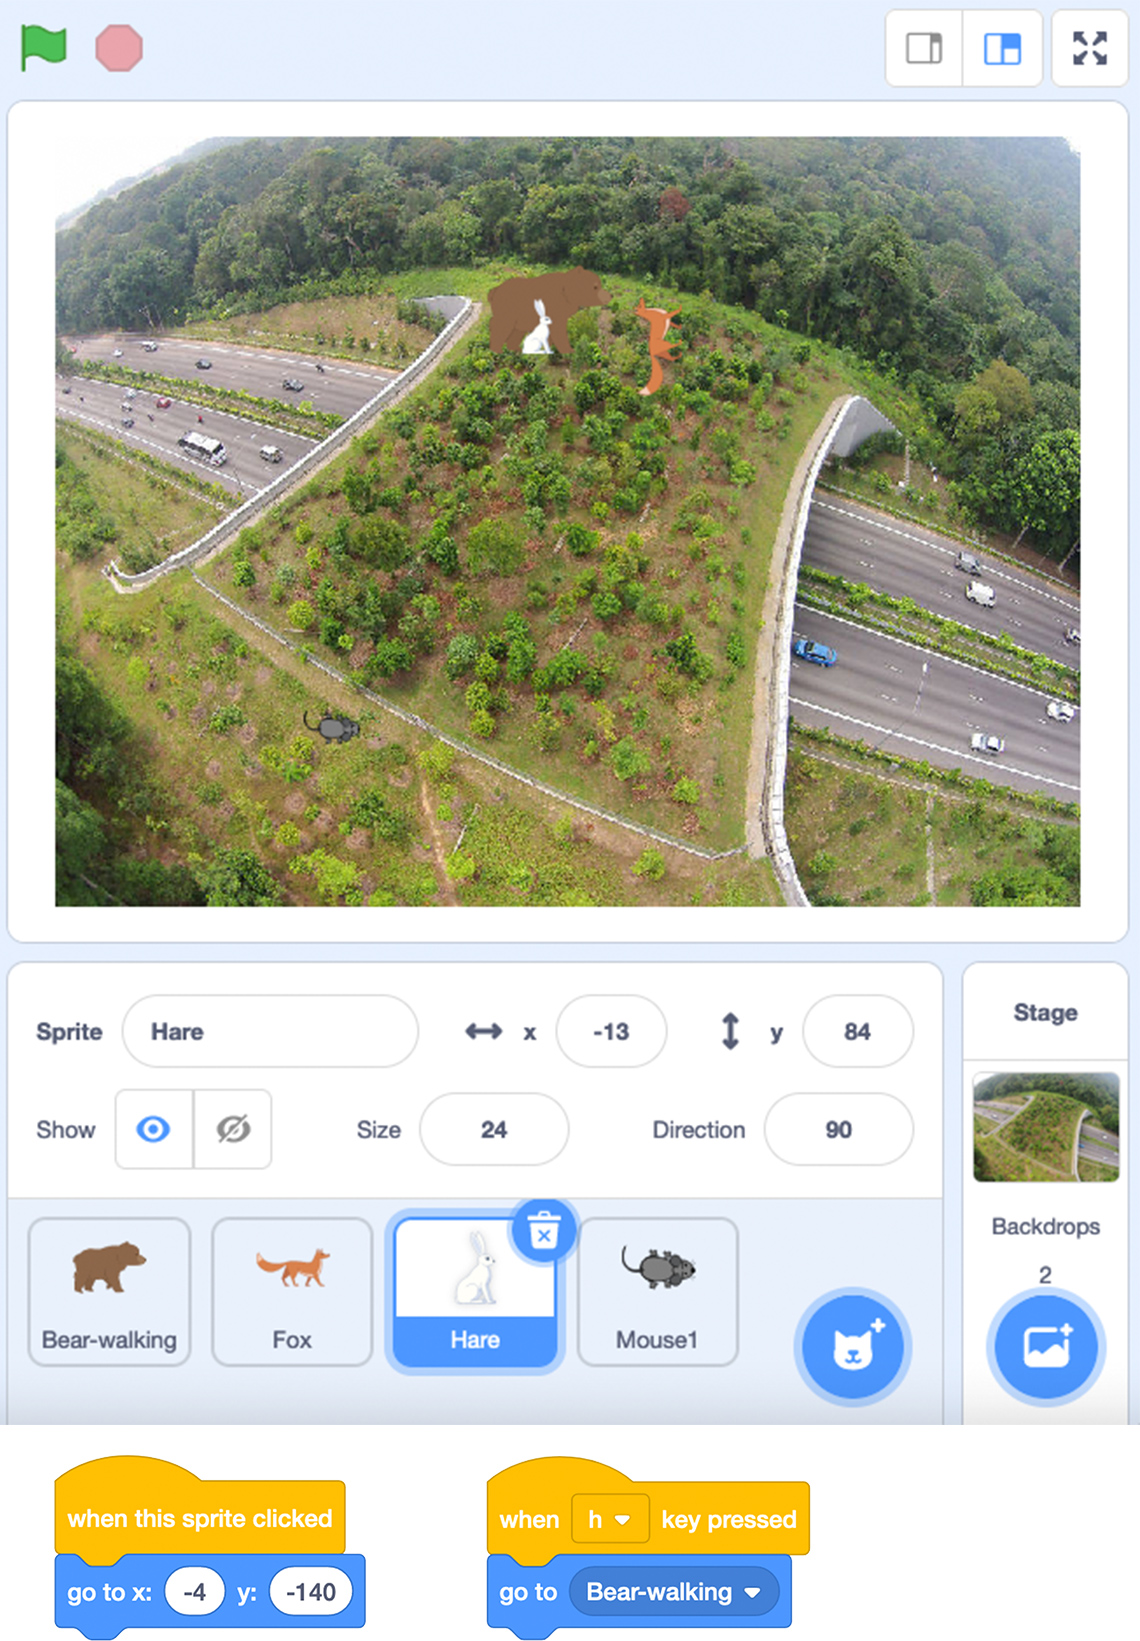
Hare scripts 1B and 2B
The Hare sprite scripts 1B and 2B.
The first script is the following: When this sprite clicked, Go to x: -4 y: -140.
The second script block is the following: When h key is pressed, Go to Bear-walking.
Consolidation
Try it!
Mouse sprite
It’s time for you to create the script for the last Sprite “Mouse.” You can use any of the scripts used in coding the other animals in the Action section.
Record your script using a digital tool, in writing or as an audio description. As you create code for the wildlife crossing model, use the following checklist.
Mouse sprite script checklist
As you create your code, make sure that you:
What do our “wildlife crossing” models tell us?
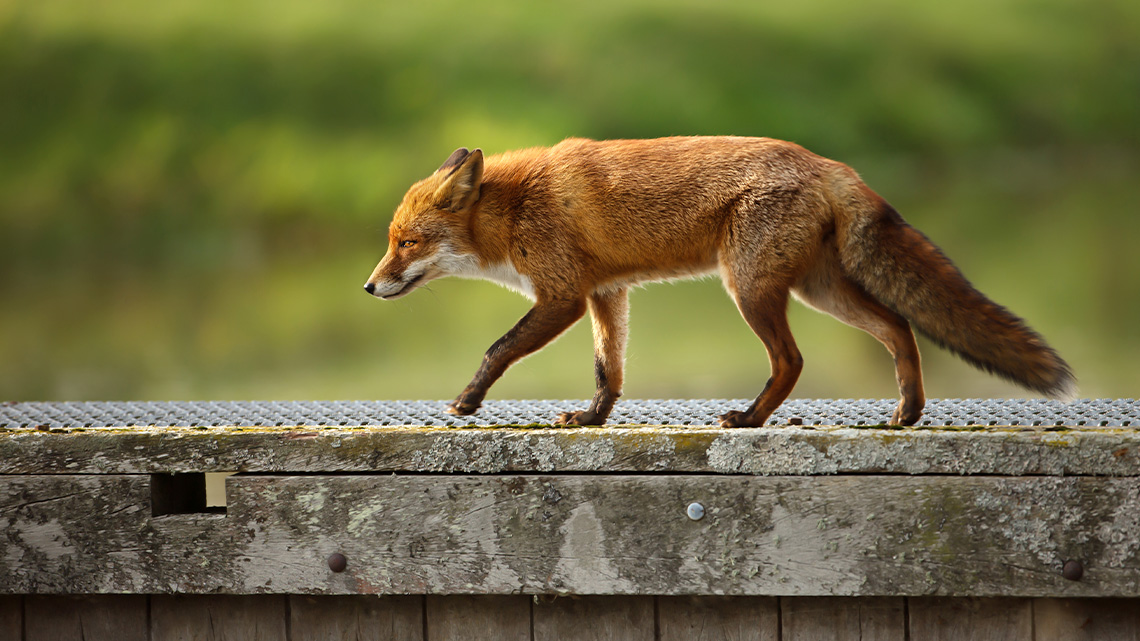
Answer the following questions.
- What are some reasons that animals might need to travel?
- What are some things that get in the way/make things difficult when animals travel?
- What can humans do to help animals get past these obstacles?
Record your answers using a method of your choice.
Press ‘Ideas’ to access some possible answers.
|
1. |
Animals need to travel to find food and water. |
|
2. |
Sometimes habitat destruction due to human structures such as roadways can cause animals to relocate. |
|
3. |
Humans can build structures such as animal crossings to help animals. |
Reflection
How do you feel about what you have learned in this activity? Which of the next four sentences best matches how you are feeling about your learning? Press the button that is beside this sentence.
I feel…
Now, record your ideas about your feelings using a voice recorder, speech-to-text, or writing tool.