Minds On
Bridges are all around the world!

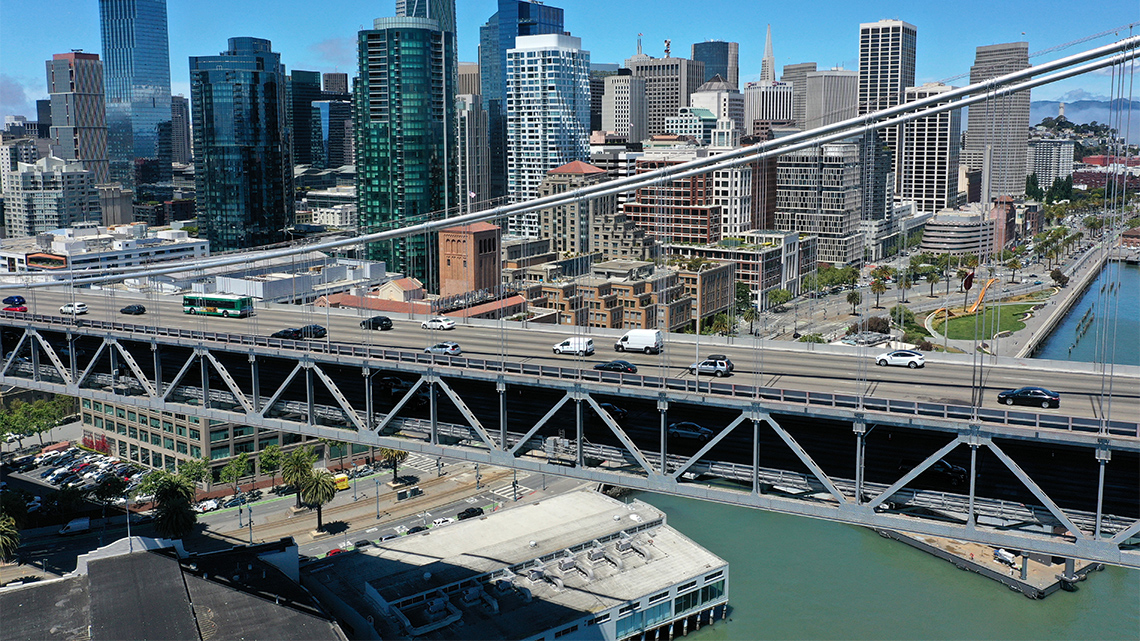
The Golden Gate suspension bridge in San Francisco, USA
In this learning activity you are going to learn about bridges! So, what do bridges do? Brainstorm your ideas orally, digitally, in writing, or in another method of your choice.
Press ‘Answer’ to check out what bridges do!
Bridges help to carry people, animals, and cars over water. Some bridges even have train tracks on them for trains.
Explore the following carousel of bridges.
San Francisco-Oakland Bay Bridge, USA
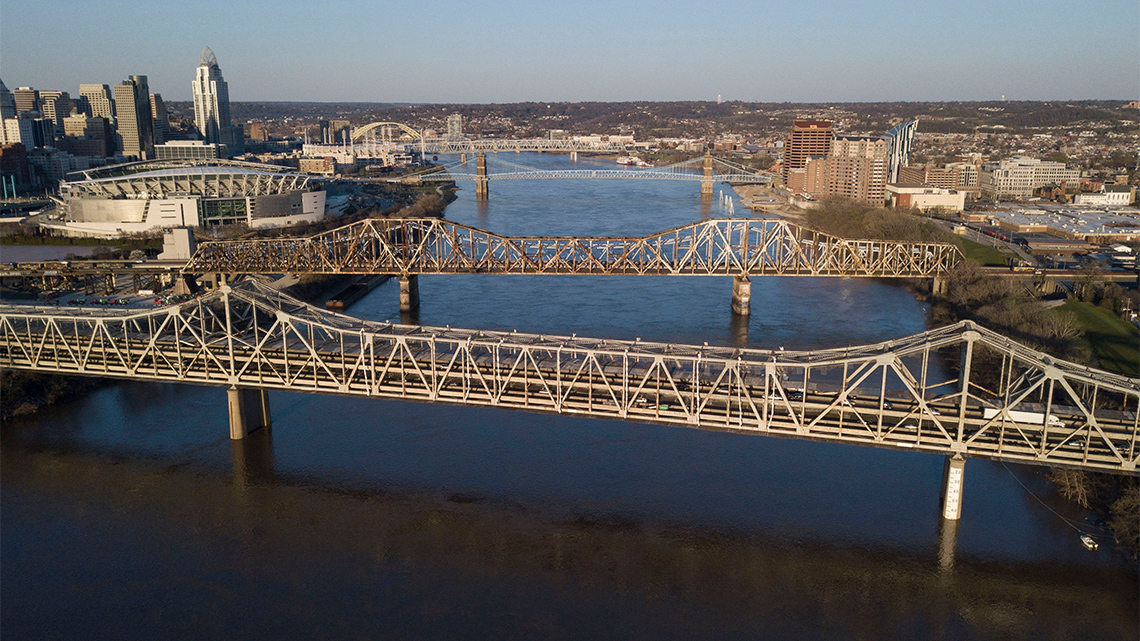
The Brent Spence Bridge, USA

Ruyi Bridge, China
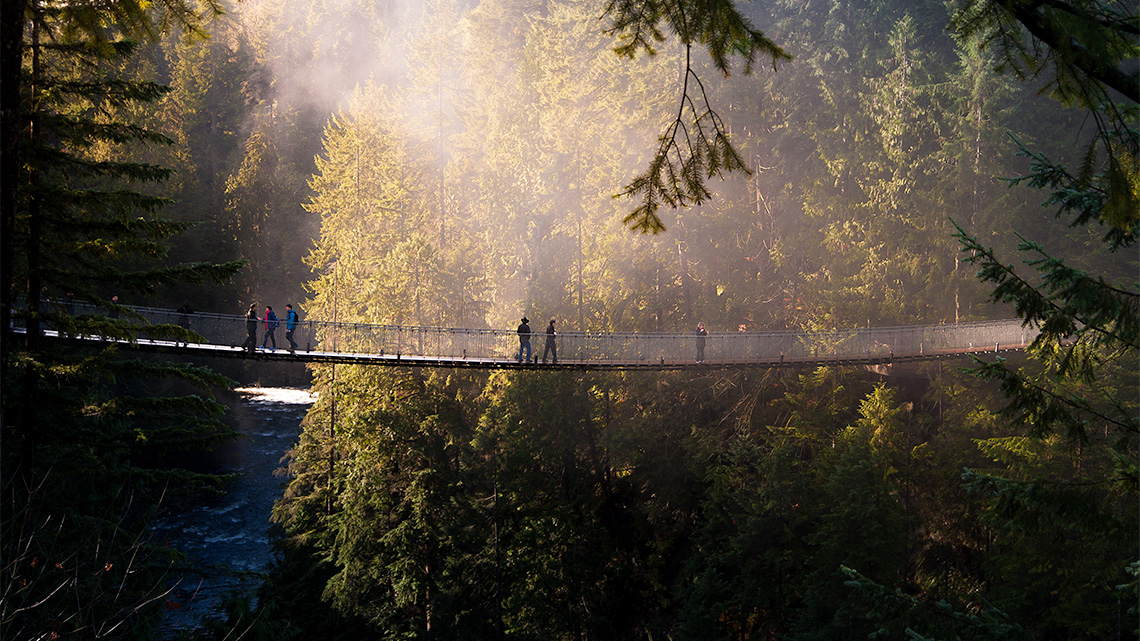
Capilano suspension bridge, British Columbia, Canada
Use the information in the previous carousel to complete the Bridges Mind Map in your notebook or using the following fillable and printable document. If you would like, you can use speech-to-text or audio recording tools to record your thoughts.
Bridges Mind Map
Record observations from the images of bridges in the previous carousel using the following mind map. Consider these questions:
- What shapes do you notice?
- How are they being supported?
- What is on them?

Press the ‘Activity’ button to access Bridges Mind Map.
Action
Materials for building bridges
Triangle versus square

Structures are all around us. They come in all shapes and sizes, but there are some shapes that are stronger than others. Which do you think might be stronger: a triangle or a square?
Let’s find out! Check out the following Power Hour of Learning video entitled “Building Bridges” to learn more about which shape is stronger to build with.
- What happened when Phil pushed on the square?
- What about the triangle?
- So, which shape is stronger?
Press ‘Answer’ to learn which shape is stronger.
When Phil pushed on the square (to the side) the square started to collapse. When Phil pushed from the top or the side of the triangle, they triangle didn’t move at all. Therefore, a triangle is stronger to build with! Did you notice any triangles in the images of bridges you explored earlier?
Ties and struts
There are other shapes that can be used when building bridges. Can other shapes be made stronger by using some of the characteristics or features of a triangle?
Press ‘Answer’ to check how to make shapes stronger.
By using struts and ties, other shapes such as squares and rectangles can be made stronger. Architects and engineers use this when constructing designs for buildings.
Press the following tabs to learn more about how a bridge is engineered.
When building a bridge, an engineer needs to consider what forces might act on that structure. Two forces they consider are tension and compression.
- Tension is when things are being pulled away from each other.
- Compression is when two things are being squeezed together.

Tension

Compression
How are tension and compression applied to bridges? And what can be done to resist them?
Compression is applied to the top of the bridge, with the weight of the load (people, cars, animals, etc.) that are on it. This load creates tension on the bottom of the bridge.

Tension and compression on a bridge
To resist the forces of tension and compression and keep the bridges stable and strong, engineers use struts and ties. When engineers reinforce a bridge, they add struts and ties to existing shapes to make the shapes stronger.
- A strut is a bar that is used to resist compression.
- A tie is a bar that is used to resist tension.
Consider the following image of three squares. What is the effect of reinforcing the square with one strut? What is the effect of reinforcing the square with two struts?

Struts

Tie
Check your understanding about what you’ve learned so far before you apply it to building your very own bridge. For each sentence, select the missing word from the drop-down menu.
Strength of a bridge
There are different bridges that are designed to be stronger than other kinds.
The strength of a structure is measured by its ability to hold a load. The load on a bridge would be the people, cars, animals, etc., that go on and across the bridge. A bridge has to be very strong and sturdy to carry the potential load that might be on it.
In the following Matching activity, choose the bridge that best fits the description!
Now that you know the types of bridges, record a list that ranks them in order from what you believe is the strongest bridge to the least strong bridge. Explain why you ordered them this way. Record your ranking using a method of your choice.
Press ‘Answer’ to check your answer!
|
Strongest |
A suspension bridge is the strongest because the force of the load is spread out across the deck, beams, and cables using tension and it is anchored down on both ends. |
|
Strong |
A truss bridge is strong enough to hold cars and a larger load, but it is difficult to build a truss bridge over wide bodies of water. |
|
Weakest |
A beam bridge is the weakest of the bridges. If there is too much weight in the center of a beam bridge, it would collapse. A beam bridge is best for walking or bicycles but might not be strong enough for cars. |
Building bridges (STEM)

The habitats of animals and plants are often taken away during events like constructing houses or buildings, or during forest fires and even flooding. Often, animals that are trying to move from one area to another have to cross a road which is very dangerous. Bridges are great ways for animals to move from one place to another over water, roads, and other obstacles.
Engineering design process

How do engineers plan their designs? To think like an engineer, we can follow the same steps to make our designs! In Science we ask questions to help us figure out what the problem is.

Brainstorming is when you think about ideas like how to solve a problem.

When you plan something, you think about the steps you have to follow and the materials you will need.

It’s time to build. Gather your materials and your plan and start building!

Testing lets you try out your design to see if it works.

Improving is about making your design even better.

Sharing what you have learned lets other people know about your topic too!
Now it’s your turn to think like an engineer! Your task is to design, and, if possible, build a bridge that provides a way for animals to cross a busy highway or over water.
Before you begin, explore the following ScienceXplosion video entitled “Super Shape” for inspiration!
Let’s get to work! Our problem is that animals need to be able to safely cross over a highway or water. Following the engineering and design process, you will design your bridge to solve this problem.
Press the following tabs to follow the steps for your bridge design! You can use the How to Make Your Bridge graphic organizer following the accordion or by using a method of your choice.
The problem is that animals need to be able to safely cross over a highway or water. What are possible solutions for this problem?
Using the How to Make Your Bridge graphic organizer or a method of your choice, brainstorm as many possible ideas for your bridge.
I can brainstorm ideas by:
- thinking about all the possible ideas or solutions
- thinking about what bridge designs already exist and how they will help me with my design
- thinking about what I have learned about sturdy shapes
- considering how I can change an existing idea and combine it with my own ideas
Now it’s time to design your bridge! Using a detailed diagram with labels to design what your bridge will be like and what materials you will use. Be sure to consider how you would test your bridge out.
I can design my bridge by:
- choosing the best solution out of all the ones that I brainstormed
- recording the steps I would need to follow to construct my bridge
- recording all materials needed
- recording other equipment I might need (i.e., what would you use to test your bridge?)
- thinking about how much time I would need to complete the bridge
Following your design, build a protype (or model) of your bridge if possible. You could use various household materials, such as: recycled materials, glue, tape, straws, pipe cleaners, marshmallows, clay, etc.
Now that you’ve build a prototype or model of your bridge, it’s time to test it out! When you were planning, you brainstormed ideas for how you could test the strength of your bridge. You might choose to stack an object on top of the bridge and see how much it can hold. As you are testing, think about what changes you might want to make to make your bridge more strong and stable.
I can test my prototype by:
- running many tests in different ways and with different materials
- recording my observations from my tests
- getting feedback from others
Using the information that you gathered while testing, make changes to your prototype to improve its strength and stability. Think about how you can make it a little bit better.
I can evaluate and revise by:
- considering the results from my testing
- thinking about new ideas and solutions that I could add to my bridge
- reviewing my design and what I learned before to make changes
- thinking about new materials or parts that could be added
- making final changes and testing again
Complete the How to Make Your Bridge Worksheet in your notebook or using the following fillable and printable document. If you would like, you can use speech-to-text or audio recording tools to record your thoughts.
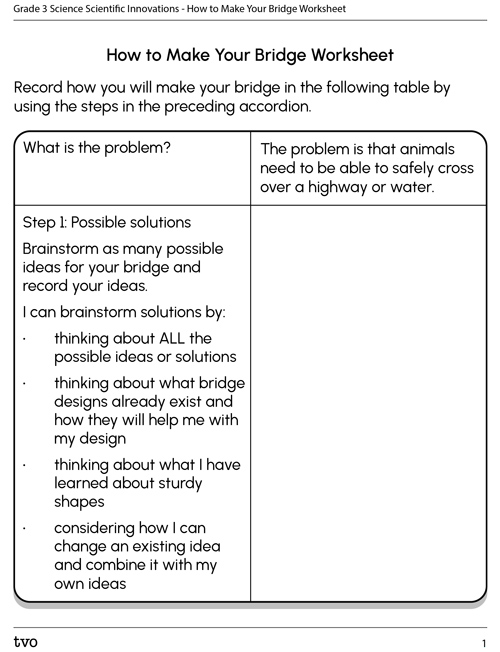
Press the Activity button to access the How to Make Your Bridge Worksheet.
Activity (Open PDF in a new window)Consolidation
Evaluate your design

Think about the bridge that you designed in this learning activity. Respond to the following checklist of questions using a method of your choice:
Bridge design evaluation checklist
Use the following checklist of questions to evaluate your bridge design. Record your answers using a method of your choice.
Reflection
How do you feel about what you have learned in this activity? Which of the next four sentences best matches how you are feeling about your learning? Press the button that is beside this sentence.
I feel…
Now, record your ideas about your feelings using a voice recorder, speech-to-text, or writing tool.