Minds On
Renewable energy

As global energy demands increase, discovering ways to harness various forms of renewable energy has become a priority.
Renewable energy sources take several different forms, such as the sun, wind, and water.
Let’s explore the different types of renewable energy sources in the following activity.
For each renewable energy source, select the type of energy it creates.
Brainstorm
Brainstorm
What challenges do you think might be associated with each type of energy source?
Consider the location and supply when you brainstorm and formulate your response.
Record your ideas in a notebook or another method of your choice.
Action
Innovation in Canada
This learning activity features emerging technologies, STEM contributions, and Canadian innovations that are making a difference.

Energy sources
There are many forms of renewable energy that offer the possibility of meeting human energy demands in the twenty-first century.
Press the following tabs to access examples of energy sources that are shaping the future of human energy consumption.
Energy generated from the sun is becoming increasingly practical to use for energy production.

Wind energy is generated by wind turbines. Wind turbines are frequently placed on coastlines and in fields to take advantage of natural winds.

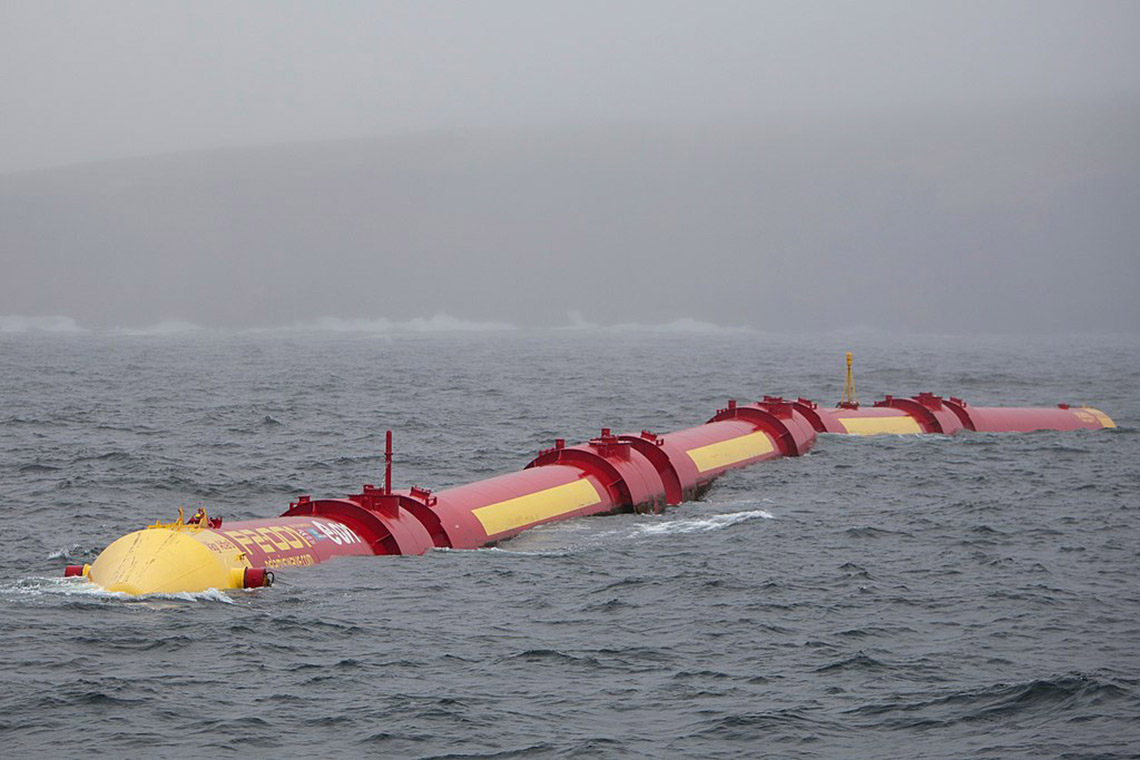
Tidal energy is generated by turbines using power from the rise and fall of sea levels.

Wave energy is on the very cusp of renewable energy innovation. Scientists are experimenting with various methods of harnessing the power of waves. Wave energy is available in oceanic environments.
Geothermal power harnesses the steam from geysers and converts it into usable energy.

Biomass power converts energy from live or dead organisms, including wood, plants, and waste.

Let’s sort!
For this activity, explore and sort the following statements items as true or false.
Harnessing solar energy
Perhaps the most unlimited source of renewable energy is solar energy.
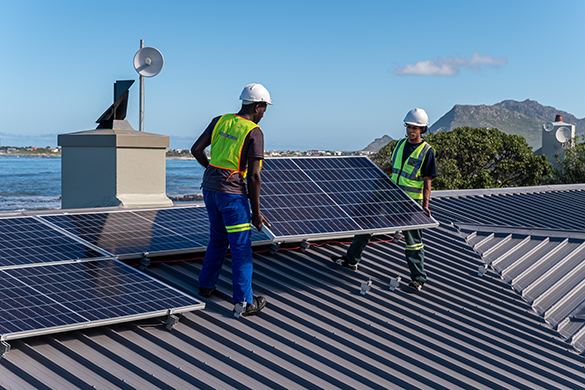
It is becoming increasingly practical to use the sun for energy production.
There are some limitations with this technology depending on location and amount of daily access to sunlight (some geographical regions receive consistent sunlight, while others may experience a lack of sunlight), but future technologies may be able to find more efficient methods of harnessing solar power.
Did You Know?
Did you know?
Solar panels can produce between 250 and 400 watts per hour. Generally, they have a capacity to produce between one kW and four kW.
Statistics Canada has suggested that the average household in Ontario consumes 722 kWh of electricity per month using traditional sources.
Solar panels may provide a way of lowering the dependence on traditional energy sources by replacing them with renewable energy.
Coding energy

Businesses consume larger amounts of energy, with paper and metal manufacturing consuming the highest annual amounts in Ontario of roughly between 500 and 500 petajoules (138,888,888,888.8889 kWh).
If a solar panel is charged for five hours, it can generate up to 1.5 Kilowatt hours of energy.
Let’s explore solar energy through coding.
Let’s explore coding with Scratch!
Coding is a computer programming language that can be used to model concepts and design programs.
Scratch is a coding application that uses blocks to create code. Let’s learn more about how we might use Scratch.
Student Success
Let's think about code!
When you start your own project in Scratch, you will be making code using blocks. A blocks is a small piece of code that appears to be a puzzle piece or a building block. You can use blocks to build your own code. Each kind of block controls an action. There are 9 kinds of blocks available at the start! As you learn more, you may find other types of blocks to add to your code.
Each block describes an action that is performed by a character. An action is like an instruction. A character can be a sprite or a backdrop. A sprite is an image of a person or object. A backdrop is an image of a background or a place. Your code creates actions that affect a sprite or a backdrop. You can choose if you are using a sprite or a backdrop.
As you make your code, you are connecting blocks to make a code block. Your block of code is known as a code block or a script! The space where you build your code is also known as the scripts area. Press and place each of your blocks into the centre area to make your code. When you activate your code, it is known as running your code.
To start creating code, press on a block and move it to the center area. Press and snap or place your next block under your current block. Now you have created a code block!
Once you have made a code block, your code should perform an action. The action can be made by a character like a sprite or a backdrop. You can make as many characters as you like. You can make different coding instructions for each one!
You can change the order of your blocks or delete a block at any time. You can also copy or duplicate a section of your code. To copy code, right-click on the first block you want to copy. It will copy all of the blocks that follow it. Connect your copied code to the bottom of the code block you want to it added to!
To explore some possible code elements and blocks that you may come across in this learning activity, press on the following tabs:
A sprite is a character that carries out the actions that you make with your code.

Sprite
The backdrops can also be changed by your code. Some blocks change what the backdrop will do!

Backdrops
A motion block makes a sprite move! You can move, turn or ask a sprite to move to a certain position.

Motion
A looks block changes how a sprite looks! You can choose costumes for each of your sprites.

Looks
A sound block make audio, or a sound. You can use the audio that is included in Scratch. You can also record your own sounds!

Sound
An events block is the start button for a code block. To decide when you want your code to run or start, place an events block at the beginning of your code. Your events block is how you decide when your code will start!
Your events block has to be your first block because it starts your code. You can choose how you want your code to start!

Events
A control block is a block that controls when an action happens. A control block can change the order and timing of an action. You can use control blocks to wait, to repeat and even to loop your code!

Control
A sensing block is a block that helps characters work with each other.
For example, what happens if you have two sprites ask each other a question?

Sensing
An operators block is a block that adds math to your code.
Operators blocks can be tricky to put together.
Before you can put an operators block in your code block, you have to add another block! You could use a sensing block or a variables block. You will need to fill any blank spaces that are part of your operators block. Press and drag a sensing or variables block to snap into any blank spaces. Now you can put your operator block in your code block!

Operators
A variables block is a block that keep track of information. A variables block helps to change how to code is run each time. It can be used to create a challenge in a game!

Variables
My Blocks is a special area to keep your very own blocks! You can save your own blocks in the My Blocks category.

My Blocks
Now you have explored what kind of blocks you can use in Scratch!
Student Tips
Student tips
Press the following tabs to access more Scratch tips you will be using in this learning activity.
Check out the following image to explore how to run the code.
Press the green flag icon on the upper left corner to run the code.
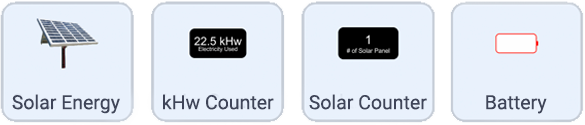
When creating a program using Scratch, computer programmers use Sprites, which are objects or characters that will follow the instructions.
In this program, there are separate scripts (blocks of code) for each of the following Sprites: Solar Energy, kHw Counter, Solar Counter, and Battery.
Access the following Scratch code: Scratch(Opens in a new window)
Press on each of the Sprites to explore the different scripts (blocks of code).
Explore the code
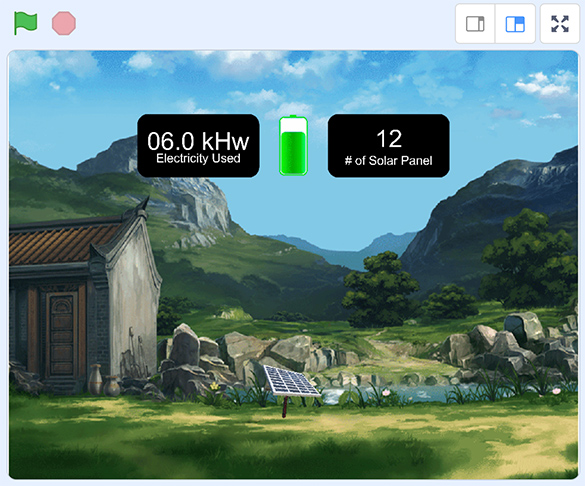
Let’s explore the Solar Panel Counter program, which is created with Scratch.
Access the following Scratch link: Scratch(Opens in a new window)
The goal is to cut down the amount of electricity sourced from non-renewable sources and bring the electricity counter to zero. Press on the solar panels to generate electricity. After exploring the program, respond to the following questions:
- What happens every time a solar panel is created?
- How many solar panels does the user have to lay down to bring the electricity counter to zero?
Press ‘Let’s Check!’ to access the correct responses.
- The relative amount of Kilowatt-hour electricity goes down by 1.5 kWh of energy.
- 16 solar panels are needed to bring the electricity counter to zero.
- Therefore, to fully power a small building, 24kWh of electricity is needed. Every time a solar panel is placed, it reduces the power consumption of the small building by 1.5kWh. Once 16 solar panels are placed, the electricity pulled from the grid becomes zero.
Try It
Your turn!
Let’s consider a way we can simulate the same solar power activity using a table.
We will use similar parameters for our activity as we previously explored from Scratch.
The simulation will be made in such a way that every time a solar panel appears, the relative amount of Kilowatt-hour electricity reduces by 1.5 kWh. The goal is to use enough solar panels to generate 24 kWh.
Press the following tabs to access detailed steps for this task.
Let’s begin by exploring the input and output relationship – that is, every time we lay a solar panel (position), the amount of electricity generated (input) in relation to the total electricity saved (output).
|
Position (number of solar panels placed) |
Input (Solar Panel kWh) |
Output (Lowering of Electricity kWh) |
|---|---|---|
|
1 |
1.5 |
22.5 |
|
2 |
3 |
21 |
|
3 |
4.5 |
19.5 |
|
4 |
6 |
18 |
|
5 |
7.5 |
16.5 |
|
6 |
9 |
15 |
|
7 |
10.5 |
13.5 |
|
8 |
12 |
12 |
|
9 |
13.5 |
10.5 |
|
10 |
15 |
9 |
|
11 |
16.5 |
7.5 |
|
12 |
18 |
6 |
|
13 |
19.5 |
4.5 |
|
14 |
21 |
3 |
|
15 |
22.5 |
1.5 |
|
16 |
24 |
0 |
Next, we will use two columns to move two markers (cards, counters, etc.) in relation to each other.
Check out the following organizer, Solar Power Table, to complete this task.
Complete the Solar Power Table in your notebook or using the following fillable and printable document. If you would like, you can use speech-to-text or audio recording tools to record your thoughts.
|
Table 1 is the solar energy generated (in kWh) each time we add a panel, which will lead to a rise in energy. Table 2 is the corresponding amount of electricity saved and will decrease in relation to each solar panel that is laid. Each time you move a position on Table 1 (upward arrow card), move the corresponding card down on Table 2. |
|
|
Table 1 (Solar energy) |
|
|---|---|
|
24 |
|
|
22.5 |
|
|
21 |
|
|
19.5 |
|
|
18 |
|
|
16.5 |
|
|
15 |
|
|
13.5 |
|
|
12 |
|
|
10.5 |
|
|
9 |
|
|
7.5 |
|
|
6 |
|
|
4.5 |
|
|
3 |
|

|
1.5 |
|
Table 2 (Energy saved) |
|
|---|---|
|
22.5 |
|
|
21 |
|
|
19.5 |
|
|
18 |
|
|
16.5 |
|
|
15 |
|
|
13.5 |
|
|
12 |
|
|
10.5 |
|
|
9 |
|
|
7.5 |
|
|
6 |
|
|
4.5 |
|
|
3 |
|
|
1.5 |
|

|
0 |
Press the ‘Activity’ button to access Solar Power Table.
Conditional statements
Let’s consider how we can use conditional statements to code the placement of the solar panels.
As we move upward on the chart, we will use the letter ‘U.’ At the same time, as we move closer to our electricity needs, we will use the letter ‘D’ to move downward on the output chart.
|
Movement |
Symbol |
|---|---|
|
Upward |
U |
|
Downward |
D |
To complete this, we will use conditional statements in our coding language.
When coding, computers use conditional statements to make decisions based on certain conditions.
A conditional statement is phrased as:
If condition is true then do this.
Input code
We can explore the following code for input (solar panels):
If we add one panel, then increase energy by 1.5.
Move U 1 position on the table. Energy will now equal to three.
Let’s continue to use this conditional code in the same way until the energy equals 24 kWh of electricity.
Complete the Input Code Chart Activity in your notebook or using the following fillable and printable document. If you would like, you can use speech-to-text or audio recording tools to record your thoughts.
| Input Code Chart | |
|---|---|
|
Record the input code for steps 2-4. |
|
|
Step 1 |
If we add 1 panel then increase variable (energy input) by 1.5. Move ‘U’ from position 1 to position 2 on the table. Energy will now equal to three. |
|
Step 2 |
|
|
Step 3 |
|
|
Step (Blank) |
For this step, continue to use the conditional code in the same way until the energy equals 24. At what step will this happen? |
Press the ‘Activity’ button to access Input Code Chart Activity.
Investigate
Predict
Let’s predict what the code will be like when the energy generated by the solar panels equals 24 kWh.
- At what step will this happen? How do you know?
- Is there a way that we could create a more efficient code for the input?
Record your ideas in a notebook or another method of your choice.
Press ‘Let’s Check!’ to access the correct answers for the Input Code Chart Activity.
|
Step 1 |
If we add 1 panel then increase energy input by 1.5. Move ‘U’ from position 1 to position 2 on the table. Energy will now equal to three. |
|---|---|
|
Step 2 |
If we add 1 panel then increase energy input by 1.5. Move ‘U’ from position 2 to position 3 on the table. Energy will now equal to 4.5. |
|
Step 3 |
If we add 1 panel then increase energy input by 1.5. Move ‘U’ from position 3 to position 4 on the table. Energy will now equal to six. |
|
Step 15 |
If we add 1 panel then increase energy input by 1.5. Move ‘U’ from position 15 to position 16 on the table. Energy will now equal to 24. |
Press ‘Let’s Check!’ to access a sample code for input.
Alternatively, we can create an algorithm that states the following:
If we add 1 panel then increase energy input by 1.5.
Move ‘U’ from position on the table.
Energy will now equal 1.5 times the number of solar panels laid.
Repeat 16 times.
Energy will now equal to 24.
Consolidation
Test it out!

After completing the solar power activity and created conditional statements, you may use the following checklist to guide your work.
Did you…
Pause and Reflect
Pause and reflect
Choose three questions to reflect on and respond to:
- Reflect on your project. What worked well? What skill(s) would you like to continue developing when it comes to coding?
- How has creating a table and using conditional statements helped you to describe the impact of solar energy technology?
- Why are renewable energy sources important?
- What are the potential impacts of emerging technologies on the environment?
- What are some possible actions that can be taken to ensure that businesses and communities have access to alternative sources of energy?
Record your thoughts and ideas in a notebook or another method of your choice.
Reflection
As you read the following descriptions, select the one that best describes your current understanding of the learning in this activity. Press the corresponding button once you have made your choice.
I feel…
Now, expand on your ideas by recording your thoughts using a voice recorder, speech-to-text, or writing tool.
When you review your notes on this learning activity later, reflect on whether you would select a different description based on your further review of the material in this learning activity.
Press ‘Discover More’ to extend your skills.
Discover MoreHow much is saved?
Create conditional statements to simulate the relationship between how much electricity is saved by generating solar energy.
In this code, the output (kWh of electricity saved) will begin at 22.5 and decrease by 1.5 each time.
Record your answers in a notebook or another method of your choice.
Share your work with a partner, if possible.