Minds On
Let’s get started!
Examine the following objects. What do they have in common?
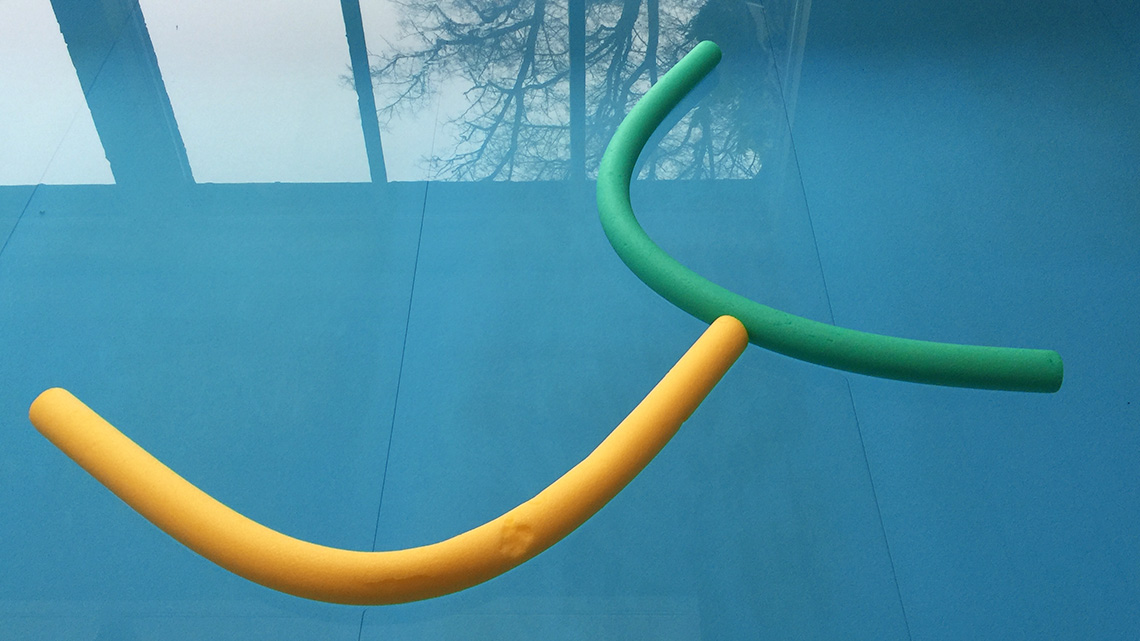

Press ‘Answer’ to explore what the objects have in common.
These objects float.
What does it mean to “float”?
How do you know when something floats?
Let’s examine another group of objects. What do they have in common?


Press ‘Answer’ to check what the group of objects has in common.
These objects sink.
What does it mean to sink?
How do you know when something sinks?
Action
Ontario connection
This learning activity highlights people, places, or innovations that relate directly to the province of Ontario. Enjoy the exploration!

In Tobermory on Lake Huron, there are many boats that used to float but have now sunk at the bottom of the lake. Scuba divers swim into the deep water to explore. We can also explore the deep water without scuba divers going deep into water. An innovator in Kitchener has developed a camera so that he can float on his boat. He can use his remote-controlled cameras to sink to the bottom of the lake to take photos.


An underwater camera.
Float and sink
How do we know when something floats or sinks?
When a solid object floats, it stays on the top of the surface of the liquid.
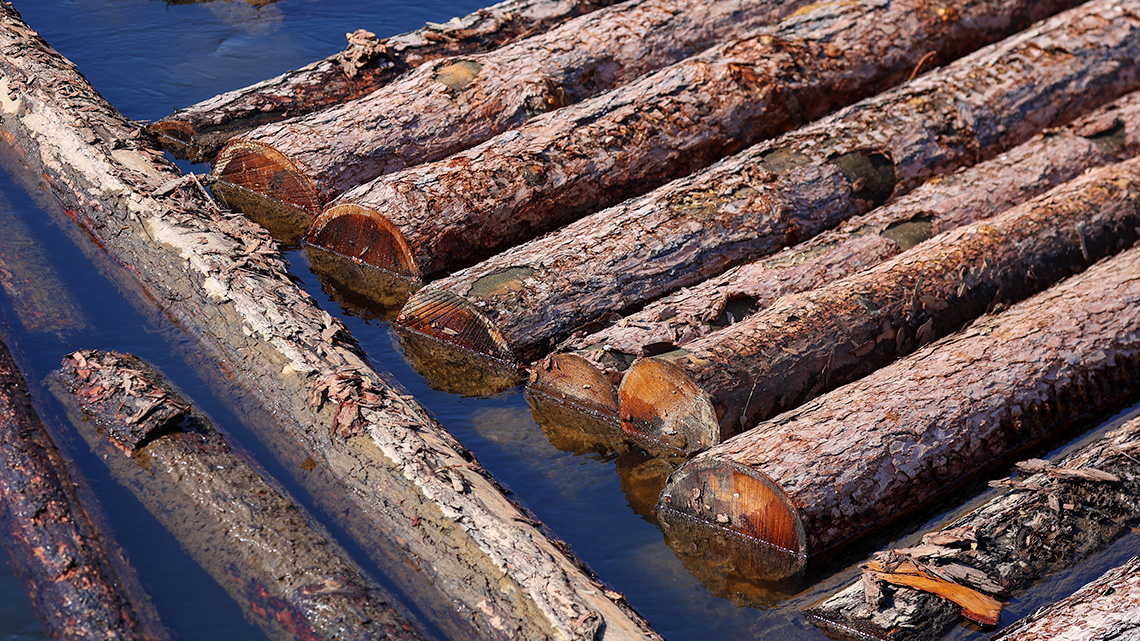
For example, the pool noodles, the wooden logs, and the feather all float.
When a solid object sinks, it falls to the bottom of the container like the marbles, the boat anchor, and the toy car.

A conversation between Teacher A and Teacher B. Teacher A: "Cool! Some objects float and some objects sink. How do we figure out if an object will float or sink?" Teacher B: "Great question, Teacher A! Let’s find out!"
What makes things float or sink?
Everything in our world is made up of things known as particles. Particles can only be examined with a microscope.

Two apples. One apple is a regular apple. One apple is under a magnifying glass. Inside the magnifying glass, there are many small dots. These dots are the tightly packed particles that make up the apple.
Some objects have particles that are packed further apart.
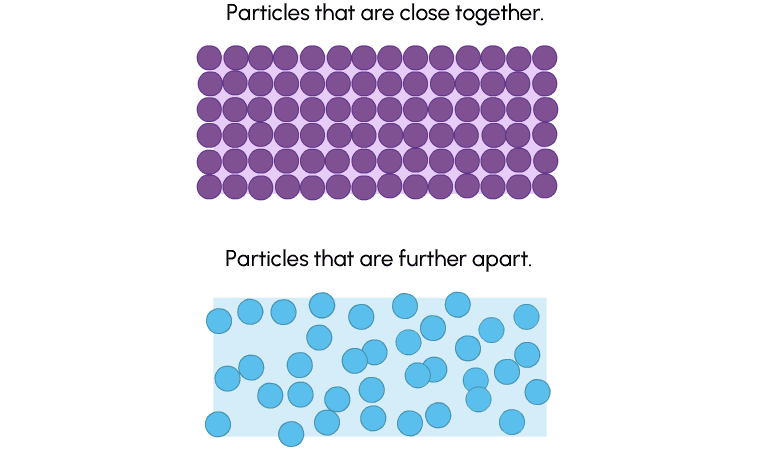
Particles shown close together with dots arranged in tight rows. Particles shown further apart with dots moving around each other freely.
Objects that have particles that are closer together tend to be heavier and sink.
Objects that have particles that are further apart tend to be lighter and float
This is why a wooden log floats and a metal toy car sinks.
Let’s experiment!

In Science we ask questions to help us figure out what the problem is.
Let’s investigate which objects float and which ones sink!

We’ve learned that some objects float and sink.
We’ve learned why some objects float and sink.
Objects that have particles that are closer together tend to be heavier and sink.
Objects that have particles that are further apart tend to be lighter and float
For example, a wooden log floats and a metal car sinks.

Next, use what you know to make predictions!
Can you think of any objects which will float in water?
Can you think of any objects which will sink in water?

Predicting is when you make a guess about what you think will happen in your experiment.
Next, you may try an experiment or access the video of the experiment in action. Test your prediction and record your results!

When you do an experiment, you are trying to find out the answers to the questions you asked.

It’s time to record what you have learned. You could write it down or make an audio or video recording.
Safety
Before you explore the following experiment, let’s perform a safety check.
Hands-on Science
Hands-on science
Press the following tabs to access the materials needed and the steps for the “Sink or Float” experiment.
- 1 wooden alphabet tile
- 1 stone
- 1 ice cube
- 1 crayon
- 1 metal spoon
- a container filled with water (the container should be big enough to fit the metal spoon)
One at a time, place each object in the container of water (wooden alphabet tile, stone, ice cube, crayon, and metal spoon).
As each object is placed in the water, notice what happens. Does the object sink or float? Did anything surprise you?
Be sure to record what happens using a method of your choice or using the Sink or Float Experiment document provided. If you are using the Sink or Float Experiment document, record what happens in the “What I noticed” column in Record section.
Check out this video to explore a demonstration of the “Sink or Float” experiment.
Complete the following fillable and printable document Sink or Float Experiment or record your ideas using another method of your choice.
Press the ‘Activity’ button to access Sink or Float Experiment.
|
ASK: What are you testing? What are you trying to figure out? |
How are things that float in water different from things that sink? |
|
|
PREDICTION: What do you think will happen? Why? |
Record your prediction using pictures and/or words. |
|
|
EXPERIMENT |
||
|
MATERIALS |
|
|
|
MY STEPS |
||
|
Step 1: Gather all of my materials. |
Step 2: Fill the container with water. |
|
|
Step 3: One at a time, place each object into the container. |
Step 4: As each object is placed in the water, pause and record what happens. Does the object sink or float? What else do I notice? |
|
|
RECORD |
||
|
Object |
Prediction: |
What I noticed: |

|
||

|
||

|
||

|
||

|
||
|
THINK: How did the experiment help answer my question? How are things that float different from the things that sink? Were my predictions correct? |
Record your responses using pictures and/or words. |
|

Science is about thinking about the steps you took and things you could change to make it better.
Is there anything that you could change about what you did?
Even if your attempts didn’t work out, what did you learn?
Consolidation
Putting it all together

Now that the experiment is complete, let’s move on to the next step in the process: think.
For this step, think about the experiment and what you learned. Consider the following questions:
- How did the experiment help answer my question?
- How are things that float different from the things that sink?
- Were my predictions correct?
Record your responses digitally, orally, or on paper.
If you are using the Sink or Float Experiment document, record your responses in the section labelled Think.
Check your understanding
Using what you know about things that sink and float, sort the following objects.
Student Success
Think!
In your own words, try to describe why some objects sink and some objects float.
If possible, share your answers with a partner.
Note to teachers: See your teacher guide for collaboration tools, ideas and suggestions.
Reflection
How do you feel about what you have learned in this activity? Which of the next four sentences best matches how you are feeling about your learning? Press the button that is beside this sentence.
I feel…
Now, record your ideas about your feelings using a voice recorder, speech-to-text, or writing tool.