Minds On
Sort it out!
For each ‘state of matter’, select the corresponding image.
Brainstorm
Brainstorm
Let’s think about the previous activity and the following questions:
- What clues did you use to sort the images and the terms?
- How are the images similar? How are the images different?
- What do you know about the different states of matter?
- What do you know about the particle theory of matter?
Record your ideas in a notebook or another method of your choice.
Share your ideas with a partner, if possible.
Action
The particle theory

The particle theory of matter is a scientific model used to explain how different types of matter behaves.
Let’s explore the main points of the particle theory:

- All matter is made up of particles.
- All particles in a pure substance are identical (no two different pure substances have the same particles).
- All particles have space between them.
- All particles are always moving.
- All particles are attracted to one another.
Types of matter
The three types of matter that are solids, liquids, and gases. The particles that make up each type of matter move differently and are arranged in different ways.
Press the following tabs to explore each type of matter.

In a solid, the particles are packed closely together.
This state of matter has the least amount of energy because the particles are not moving around the space. Instead, they are vibrating in their place.
The density of a solid is high because the forces holding the particles together are strong.
The particles in a liquid are packed closely together, but differently than in a solid.
The forces that hold the particles together are not as strong as in a solid. These particles can move around each other. Their shape is not fixed. So, it changes depending on the container that holds the liquid.
Some liquids are thicker than others, and move more slowly. Liquid particles have more energy than solids.
The particles in a gas are far apart from each other.
The energy in these particles is higher than in a liquid and a solid. The particles are always moving in all directions and collide into each other and the sides of the container that holds them. This causes pressure in the container.
A gas is a state of matter with no fixed volume or shape.
In other words, gases take the shape of their container and can be compressed easily.
Try It
Your turn!
If someone asked you to explain the particle theory of matter to them, how would you explain it? Would you use words or images?
Record your ideas in a notebook or another method of your choice.
Exploring code!
Coding is a computer programming language that can be used to model concepts and design programs.
Let’s learn more about how we might use Scratch to explore the particle theory of matter.
Scratch is a coding application that uses blocks to create code.
Explore the following animation created on Scratch. This program simulates the particle theory of matter by demonstrating how the particles of gas, liquid, and solids move in different ways.
Access the following Scratch link: Scratch(Opens in a new window)
Press ‘Hint’ to access the particle theory of matter.
Let’s explore the main points of the particle theory:
- All matter is made up of particles.
- All particles in a pure substance are identical (no two different pure substances have same particles).
- All particles have space between them.
- All particles are always moving.
- All particles are attracted to one another.
The previously explored coding program was created by another user.
We can learn so much from the code written by others. Computer programmers often remix each other’s code to reuse in other applications. Sometimes they might even make improvements to the code or use it for different purposes.
It is important to always give credit to the original coder, which is on the “Project” page in Scratch.
Student Success
Let's think about code!
When you start your own project in Scratch, you will be making code using blocks. A block is a small piece of code that appears to be a puzzle piece or a building block. You can use blocks to build your own code. Each kind of block controls an action. There are 9 kinds of blocks available at the start! As you learn more, you may find other types of blocks to add to your code.
Each block describes an action that is performed by a character. An action is like an instruction. A character can be a sprite or a backdrop. A sprite is an image of a person or object. A backdrop is an image of a background or a place. Your code creates actions that affect a sprite or a backdrop. You can choose if you are using a sprite or a backdrop.
As you make your code, you are connecting blocks to make a code block. Your block of code is known as a code block or a script! The space where you build your code is also known as the scripts area. Press and place each of your blocks into the centre area to make your code. When you activate your code, it is known as running your code.
To start creating code, press on a block and move it to the center area. Press and snap or place your next block under your current block. Now you have created a code block!
Once you have made a code block, your code should perform an action. The action can be made by a character like a sprite or a backdrop. You can make as many characters as you like. You can make different coding instructions for each one!
You can change the order of your blocks or delete a block at any time. You can also copy or duplicate a section of your code. To copy code, right-click on the first block you want to copy. It will copy all of the blocks that follow it. Connect your copied code to the bottom of the code block you want to it added to!
Note to teachers: See your teacher guide for collaboration tools, ideas and suggestions.
To explore some possible code elements and blocks that you may come across in this learning activity, press on the following tabs:
A sprite is a character that carries out the actions that you make with your code.
The backdrops can also be changed by your code. Some blocks change what the backdrop will do!
A motion block makes a sprite move! You can move, turn or ask a sprite to move to a certain position.
A looks block changes how a sprite looks! You can choose costumes for each of your sprites.
A sound block make audio, or a sound. You can use the audio that is included in Scratch. You can also record your own sounds!
An events block is the start button for a code block. To decide when you want your code to run or start, place an events block at the beginning of your code. Your events block is how you decide when your code will start!
Your events block has to be your first block because it starts your code. You can choose how you want your code to start!
A control block is a block that controls when an action happens. A control block can change the order and timing of an action. You can use control blocks to wait, to repeat and even to loop your code!
A sensing block is a block that helps characters work with each other.
For example, what happens if you have two sprites ask each other a question?
An operators block is a block that adds math to your code.
Operators blocks can be tricky to put together.
Before you can put an operators block in your code block, you have to add another block! You could use a sensing block or a variables block. You will need to fill any blank spaces that are part of your operators block. Press and drag a sensing or variables block to snap into any blank spaces. Now you can put your operator block in your code block!
A variables block is a block that keep track of information. A variables block helps to change how to code is run each time. It can be used to create a challenge in a game!
My Blocks is a special area to keep your very own blocks! You can save your own blocks in the My Blocks category.
Now you have explored what kind of blocks you can use in Scratch!
Let’s check out how the particle theory code you previously explored was created.
Access the following Scratch link to explore the code: Scratch(Opens in a new window)
Student Tips
Student tips
Check out the following tip to guide your exploration with Scratch:
- Press the green flag at the top of the screen to execute (run) all the code that contains “when green flag clicked” blocks.
Particle movements
In this program, the particle sprites are represented by balls that are different colours.
- Gas particles have an orange costume.
- Liquid particles have a green costume.
- Solid particles have a purple costume.
Describe the different movements for each particle sprite.
Record your ideas in a notebook or another method of your choice.
When you’re ready, press ‘Let’s Check!’ to access the movements for each particle sprite.
- The gas particles are moving in a slow and smooth way, with lots of space between them.
- The solid particles stay close together inside a glass sprite. They are moving in and out with small movements, as if they are vibrating.
- The liquid particles are close together at first. They turn around and then move apart.
Investigate
Investigate
Let’s investigatethe following Scratch coding blocks for each particle sprite.
Each particle uses different blocks to code their movement.
Press the following tabs to access each particle coding block.
Check out the following code:
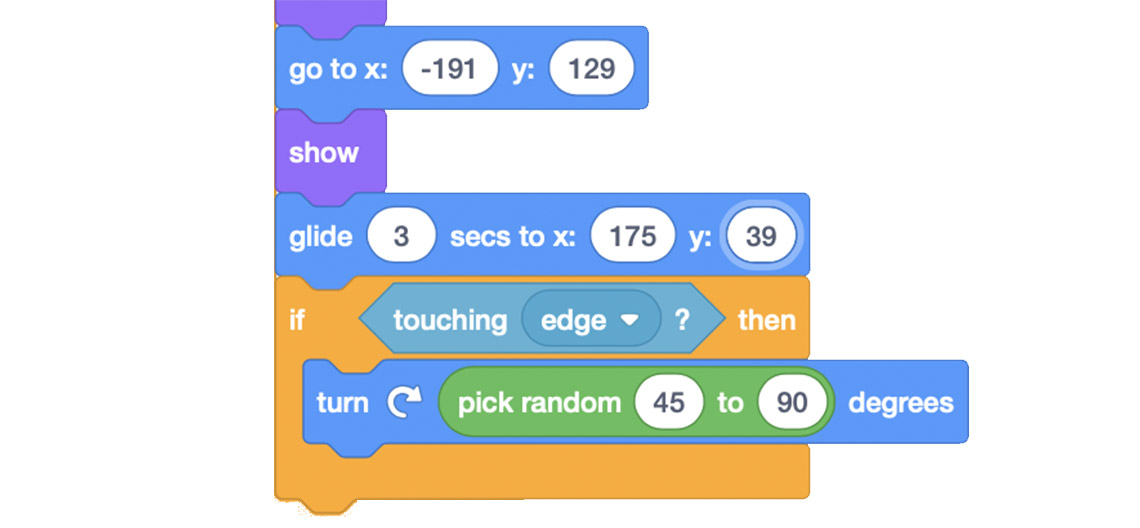
This part of the Scratch sequence is as follows:
1. Go to x: -191 y: 129
2. Show
3. Glide 3 secs to x: 175 y: 39
4. If touching edge? Then
5. Turn right pick random 45 to 90 degrees
Sprites can move using ‘x’ and ‘y’ coordinates.
- To move horizontally, a sprite will move on the ‘x’ axis, using positive or negative numbers.
- To move vertically, the sprite will move on the ‘y’ axis, using positive or negative numbers.
The glide block determines the speed and location the sprite will end up. When the sprite gets to the edge of the stage, it will turn a random value between 45 and 90 before moving forward again.
Explore the following code:
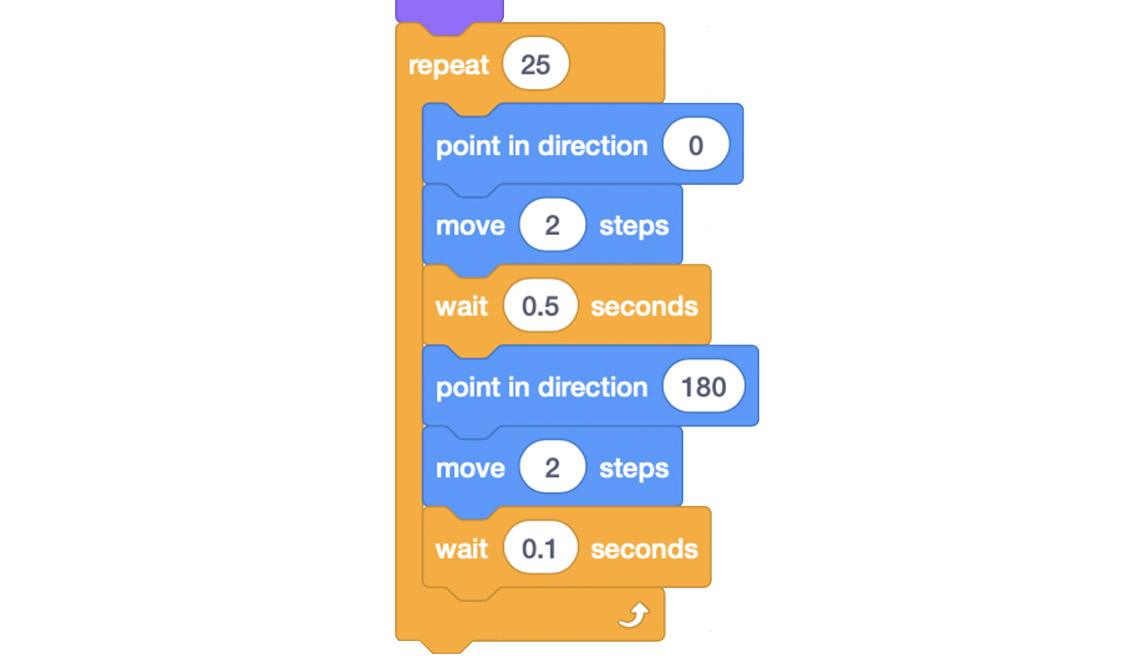
This part of the Scratch sequence is as follows:
1. Repeat 25
2. Pont in direction 0
3. Move 2 steps
4. Wait 0.5 seconds
5. Point in direction 180
6. Move 2 steps
7. Wait 0.1 seconds
These movements are inside of a repeat block. The point in direction blocks, in combination with the move block appear to make the sprite rock back and forth. First, upward (zero degrees) and then downward (180 degrees). The movements are made in short steps and are repeated 25 times.
Check out the following code:
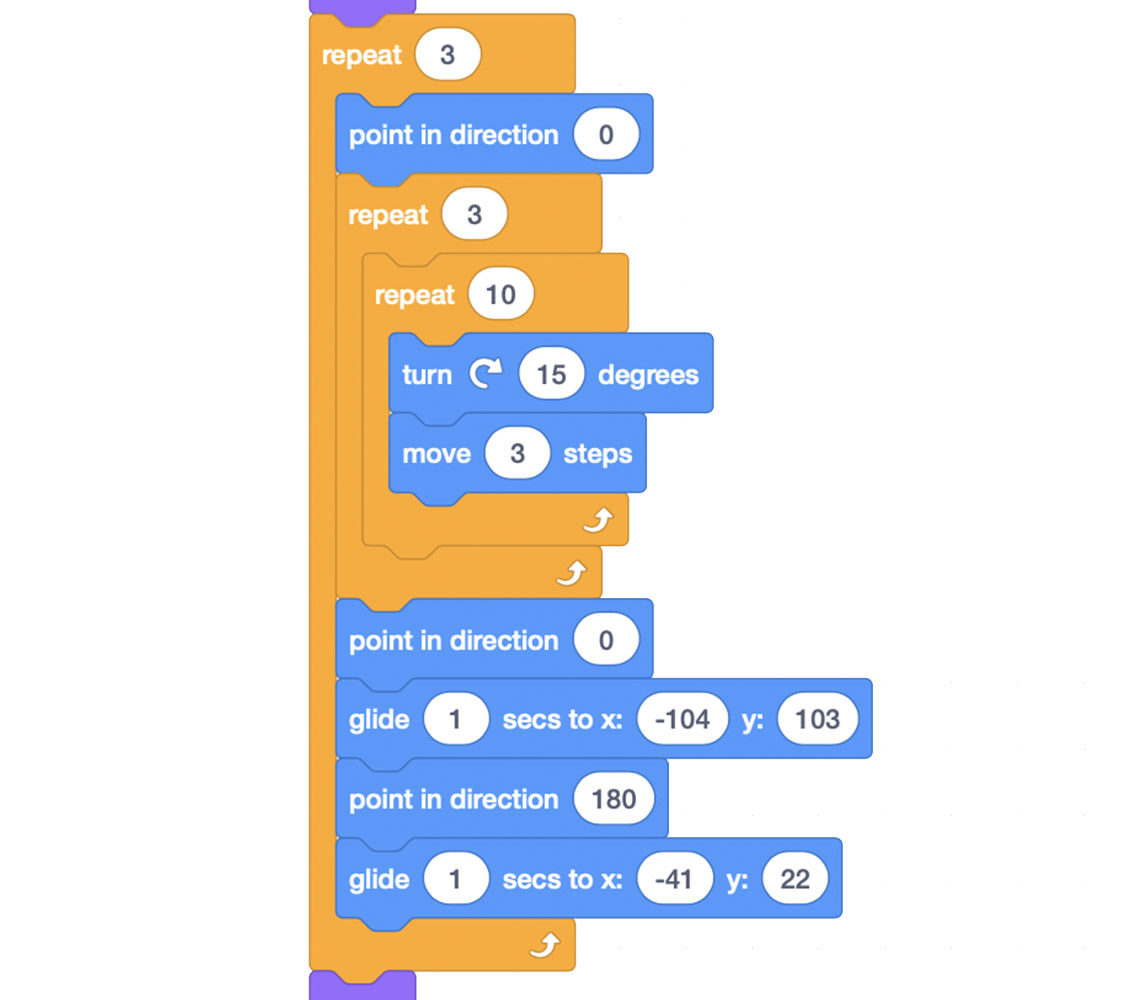
This part of the Scratch sequence is as follows:
1. Repeat 3
2. Point in direction 0
3. Repeat 3
4. Repeat 10
5. Turn right 15 degrees
6. Move 3 steps
7. Point in direction 0
8. Glide 1 secs to x: -104 y: 103
9. Point in direction 180
10. Glide 1 secs to x: -41 y: 22
The liquid particles move in two different ways.
The turn and move blocks repeat, and make the sprites appear to rotate and move forward slightly. Then, the particles glide away, point in the opposite direction, and glide back.
After exploring each particle sprite and their codes, consider the following:
- What happens when you change the numbers in the glide blocks or the point in direction blocks?
- How does the number change affect the movements of the different particles?
- How might you remix the program to make it more efficient (i.e. using fewer blocks)?
Record your ideas and thoughts in a notebook or another method of your choice.
If possible, share your ideas with a partner.
Effects of temperature

Particles are always moving, but there is something that affects how fast or how slow the particles will move…temperature!
How does temperature affect the particles? Let’s explore!
Try It
Your turn!
Let’s try to create code that simulates how gas particles are affected when the temperature is increased.
We will use Scratch to create the code.
If you have your own Scratch account, you may explore the following step-by-step instructions on your own device.
If not, press on this link to explore and alter the code: Scratch(Opens in a new window)
Press the following tabs to access the Scratch instructions.
In Scratch, let’s create a gas particle sprite.
Access the following Scratch link to create the code: Scratch(Opens in a new window)
Explore the following coding instructions:
- First, access Scratch or the Scratch link on your device.
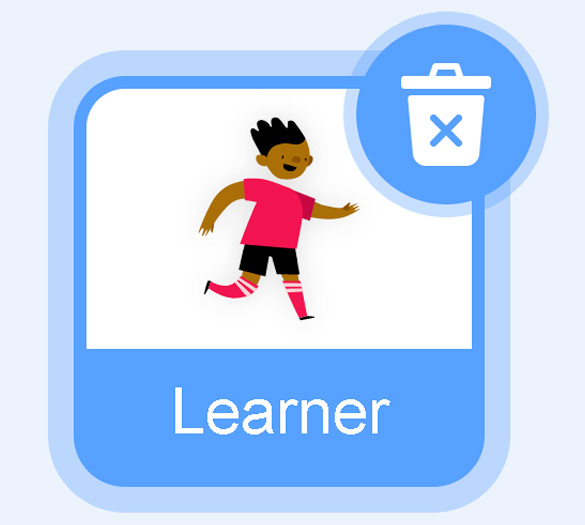
- Then, delete the Cat sprite.
- Press on Sprite to choose a sprite to represent a gas particle (e.g., ball).
- Press on Costumes to change the sprite’s costume, if desired.
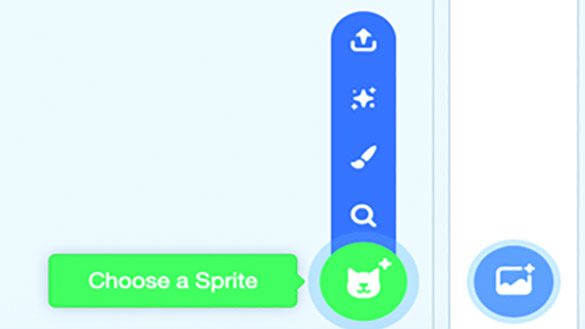
When the cat with the plus sign is pressed, it reveals four options to create a Sprite.
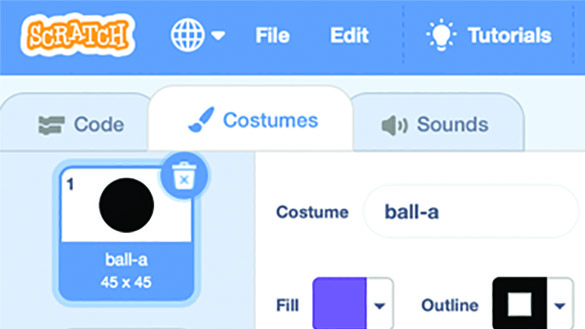
When costumes tab is pressed, it reveals options to change the colour and size of a Sprite.
Now, let’s add script for the gas particle sprite to move and bounce.
Explore the following coding instructions:
- First, in the Events tab, add the “When Green Flag Clicked” block.
- Then, in the Control tab, add the “Forever” block. The following blocks will be placed in this coding block.
- After, in the Motion tab, add the “Move 10 Steps” block, the “If On Edge” block, and the “Turn 15 Degrees” block.
- Lastly, in the Operators tab, add the “Pick Random -5 to 5 degrees” block, and nest it inside of the previous block.
- Now, run and test the code, by pressing the green flag.
Check out the following photo to help guide and build this code:
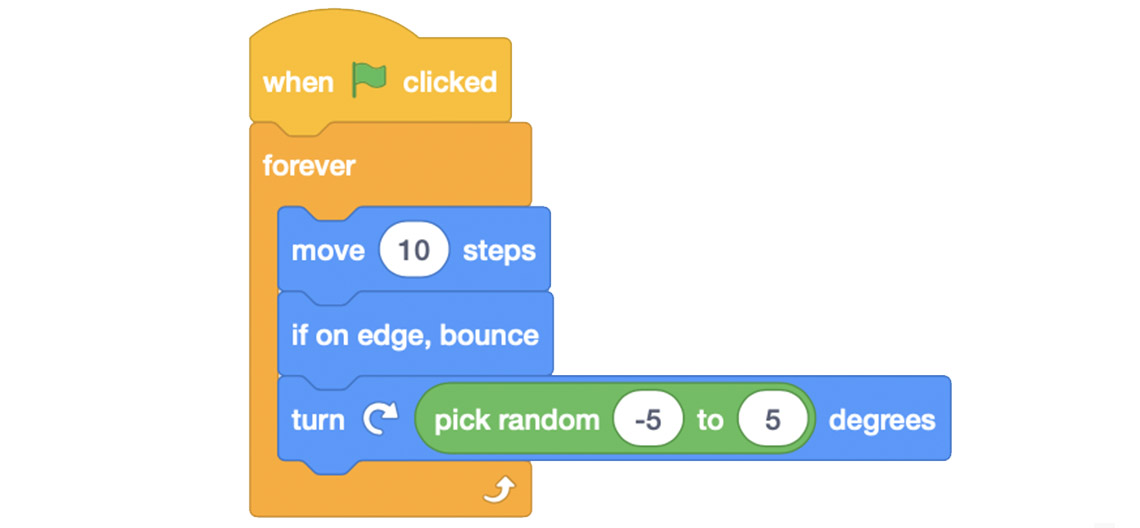
This part of the Scratch sequence is as follows:
1. When green flag clicked.
2. Forever block nested with the following blocks:
3. Move 10 steps.
4. If on edge, bounce.
5. Turn right, pick random –5 to 5 degrees.
Let’s create code for particles to bounce off of other particles.
Explore the following coding instructions:
- First, in the Control tab, add the “If/Then” block. The following blocks will be placed in this coding block.
- Then, in the Motion tab, add the “Touching Colour?” block next to the previous block. Choose the same colour for the new particles.
- After, in the Motion tab, add the “Move 180 Degrees” block, and the “Move 10 Steps” block.
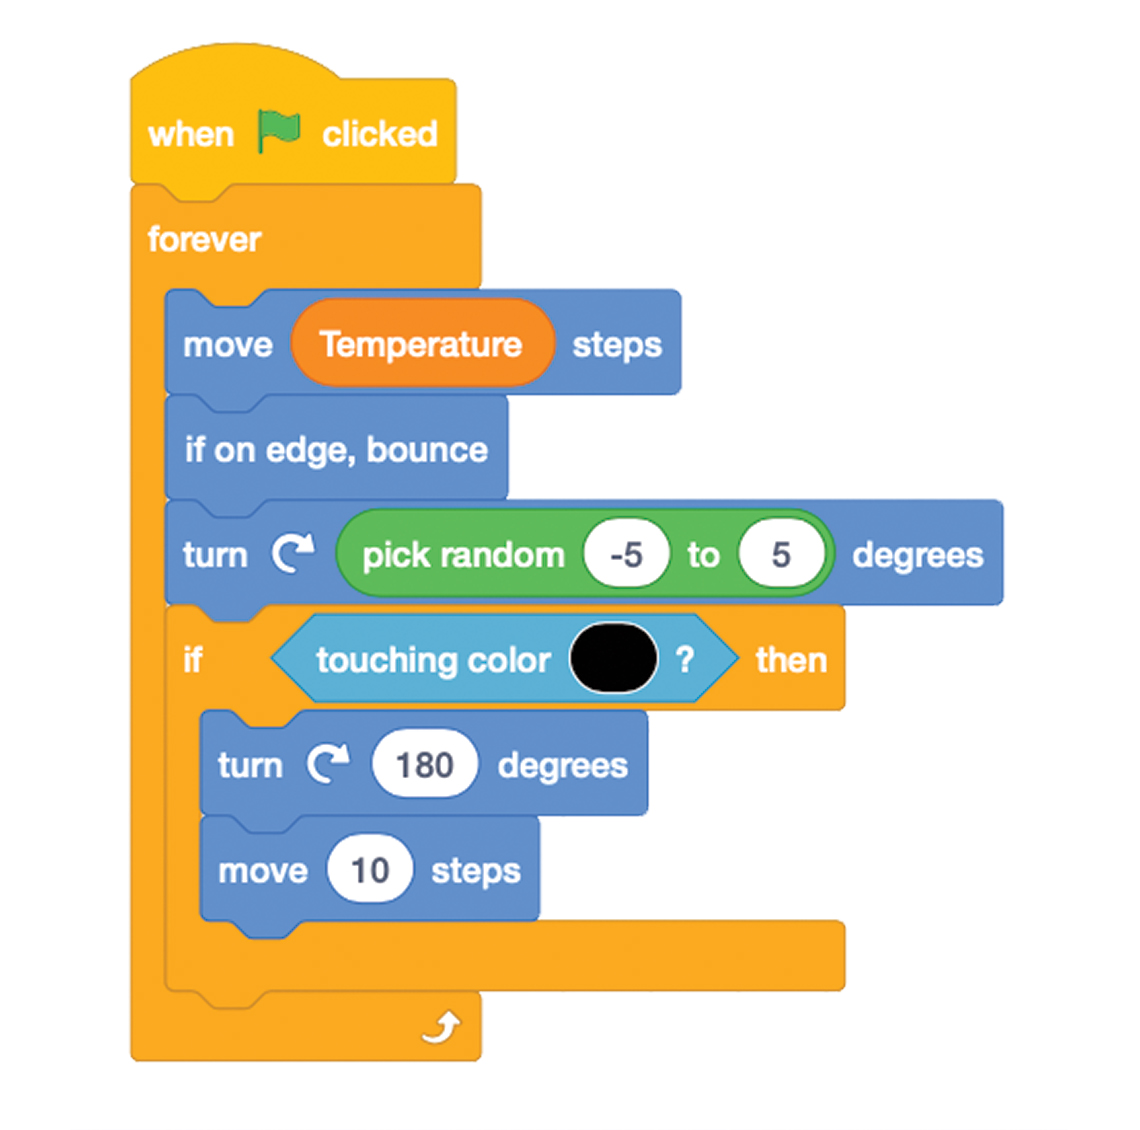
Check out the following photo to help guide and build this code:
This part of the Scratch sequence is as follows:
1. When green flag clicked
2. Forever
3. Move 10 steps
4. If on edge, bounce
5. Turn right, pick random –5 to 5 degrees
6. If touching colour ? Then
7. Turn right 180 degrees
8. Move 10 steps
After, let’s create code for the temperature variable.
Explore the following coding instructions:
- First, in the Variables tab, add the “Make A Variable” block.
This will be followed by a new screen for a new variable and to
insert the name. Let’s name the variable, Temperature.
The variable should now appear as an option with a checkmark. - Then, in the Variables tab, add the “Temperature” block, and nest it inside of the “Move 10 Steps” block.
- When you’re ready, run and test the code, by pressing the green flag. Adjust the temperature slider slowly to increase the temperature.
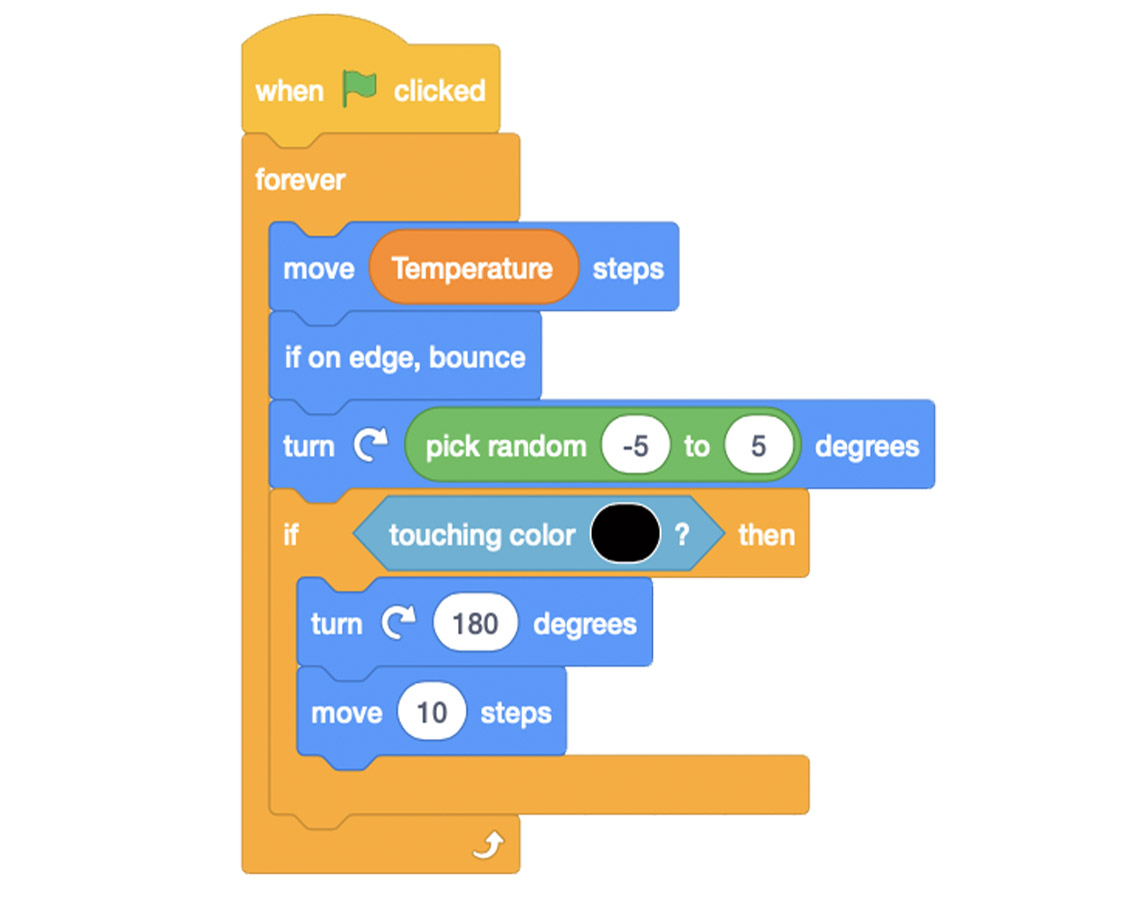
Check out the following photo to help guide and build this code:

This is a screen shot to make a new variable. The new variable name is Temperature. The option for all sprites has been clicked. The OK button is highlighted.
The completed Scratch sequence is as follows:
1. When green flag clicked.
2. Forever.
3. Move temperature steps.
4. If on edge, bounce.
5. Turn right, pick random –5 to 5 degrees.
6. If touching colour ? Then.
7. Turn right 180 degrees.
8. Move 10 steps.
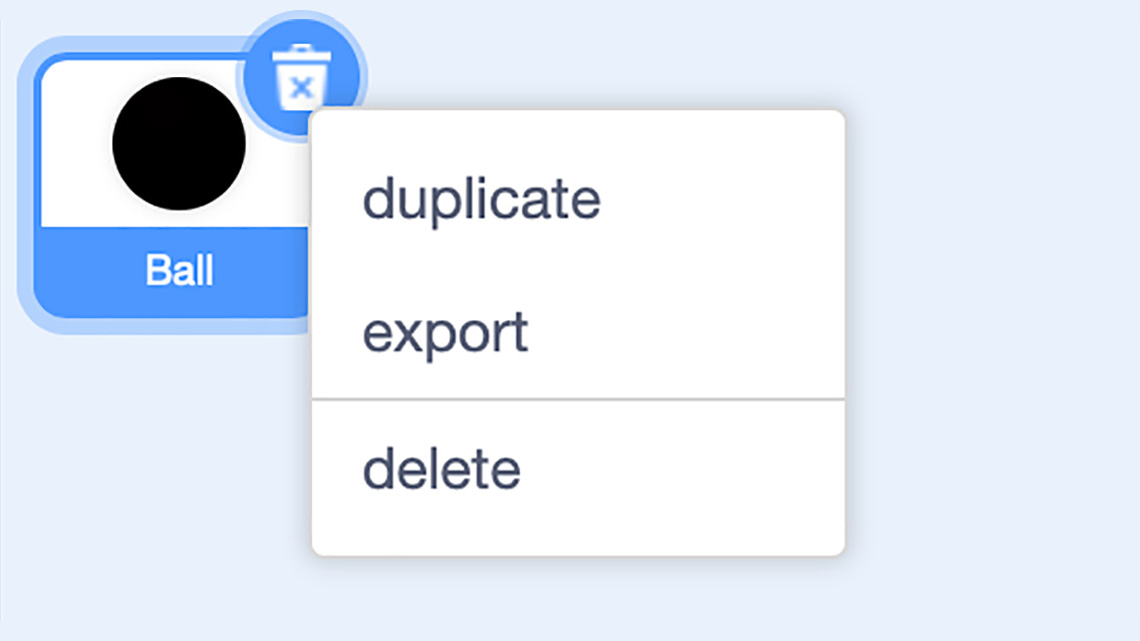
Lastly, let’s duplicate the sprite and code to create more particles.
Explore the following coding instructions:
- First, right click on the particle sprite. Choose duplicate and repeat.
- Then, to duplicate code, right click at the top of the script. This will create a copy of the entire code block. Carefully add it to the new sprite. This will copy the code for the new sprite. Then, repeat.
- When you’re ready, run and test the code, by pressing the green flag.
Check out the following photo to help guide and build this code:
Pause and Reflect
Pause and reflect
- What happened to the particles when you increased the temperature?
- How does temperature affect the movement of particles?
- Which blocks helped you simulate a change in temperature?
Record your ideas in a notebook or another method of your choice.
Press ‘Let’s Check!’ to access a possible answer.
If matter is heated, and the temperature is increased, the particles within the matter move faster. The higher the temperature, the higher the speed of the particles.
Consolidation
Test it out!

You may use the following checklist to guide and test your code out!
Did you…?
Making connections
Let’s reflect on your project.
Consider the following questions:
- What worked well? What skill would you like to continue developing when it comes to coding?
- How has writing and investigating code helped you to understand the particle theory of matter?
- How might you add to or change the code next time?
- How does temperature affect the movement of particles?
- How might the program be remixed to simulate the movement of liquid or solid particles?
Record your responses in a notebook or another method of your choice.
Share your ideas with a partner, if possible.
Reflection
As you read the following descriptions, select the one that best describes your current understanding of the learning in this activity. Press the corresponding button once you have made your choice.
I feel…
Now, expand on your ideas by recording your thoughts using a voice recorder, speech-to-text, or writing tool.
When you review your notes on this learning activity later, reflect on whether you would select a different description based on your further review of the material in this learning activity.